In this article:
Enabling or Disabling Different Payment Methods in Semble
Save a Card to a Patient's Record
Save a Patient's Card from a Terminal
Require Card Imprint for Online Booking
Taking Card Payments with a Patient Card on File
Take Payment through Online Booking
Add a Payment Link to Invoices
Change the email address shown on receipts
Secure storage of card details
Using your Terminal
Linked articles:
Navigating your Semble Pay Dashboard
Switching from Stripe Standard to Semble Pay
Integrating with Semble Pay
If you’re already using an integrated payment solution such as Stripe Standard, you can switch to Semble Pay yourself with the help of our 4 step self-serve guide here.
If you're unsure which payment provider you're currently integrated with, please refer to this guide for clarification.
If you do not have any financial integration, you can follow the steps below to integrate with Semble Pay:
1. Go to "Settings"
2. Click on "Integrations" and scroll down until you see "Semble Pay"
Note for practices based in Ireland:
For example, on a €100 transaction, you would pay the standard Stripe fees plus an additional €0.30 application fee. See Stripe rates for standard pricing.
3. Click "Connect with Semble Pay".

Enter an email address: If you have used Stripe in the past, kindly make sure that you do not use the same email address you have used with Stripe in the past), then click "Continue".

Note: If after you click "Continue" the system asks you for your password, this signals that the email address you are using has been used with Stripe before, please go back one step and use a completely new email address.
You will then be asked for a mobile number:

The next section will deal with basic details for your business:

You will then be asked to verify personal details:

As well as professional details:

Then you will be asked to add your bank account details:

As well as your public details as they will appear for customers:

Finally, you will be asked to review all your details and agree to proceed:

Upon return to Semble, you will see "Disconnect from Semble Pay" which confirms that you have successfully integrated with Semble Pay.
Important Note: If you wish to disconnect your Semble Pay integration or revert back to Stripe, please contact accountmanagement@semble.io or reach out to your account manager directly before proceeding with any actions. Our team will ensure a smooth disconnection process.
Enabling or Disabling Different Payment Methods in Semble
More information on the different payment methods can be found here.
More information on pricing can be found here.
1. Go to your Settings in Semble.
2. Click on the "Invoice and Payment" tab on the left-hand menu.
Note: If you cannot see this tab, please ask a practice manager to upgrade your role to have access to this tab. More information on roles can be found here.
3. Scroll down to the "Payment Methods" section. You can enable/disable Klarna, Apple Pay, and Google Pay by switching the green toggles on/off.
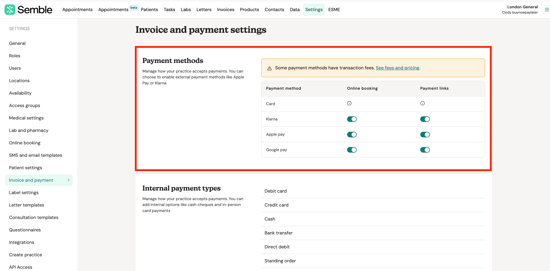
You will see four different payment options:
-
-
Card Payments (Default & Always Enabled)
-
Klarna
-
Apple Pay
-
Google Pay
-
You can also choose to enable a payment method for online payments but disable it for payment links, depending on your preference.
Your patients will now be able to use the payment methods you have enabled in your settings.

Important Notes:
-
Apple Pay / Google Pay: These payment options will only be visible to patients using a device that supports them. For example:
-
Apple Pay will only appear if the patient is using an Apple device (iPhone, iPad, or Mac) with Apple Pay set up.
-
Google Pay will only appear if the patient is using a device that supports Google Pay and has it enabled.
If a patient doesn’t see these options, it’s likely because their device doesn’t support them or they haven’t set up the payment method yet.
-
-
Klarna: Patients must have an existing Klarna account. When selecting Klarna, they will be prompted to log in to their Klarna account to complete the payment.
-
If you have enabled one of our new payment methods (such as Apple Pay or Google Pay) on your website, please ensure that the embedded code you’ve added includes the
allow="payment"attribute. This is required to support these payment methods correctly.
Refund an Invoice Payment
Requirements: Before you attempt to proceed with a refund, the patient must:
-
Have an invoice paid on their account
-
The payment must have been processed via a link on the invoice, a terminal payment, or a payment card from the patient file with a Semble Pay integration
-
If the payment was no received via Semble pay or if you don’t have an integration with Semble Pay or Stripe, you can still use the refunds feature in Semble. However, no real money will be refunded automatically — you’ll need to record the refund in Semble and process the actual refund manually through your own payment system.
1. Go to your patient file and click Invoices:

2. Click the more options icon next to the invoice that you want to refund and select 'Refund':

Please note you can also proceed with a refund from the list of your invoices in the section 'Invoices':

You can select any invoice that has at least one payment.
3. Select the payment type to proceed with the refund. You can only choose a type of refund equivalent to the original payment method:

4. Select the amount to be refunded, this can be any amount up to the original amount paid:

5. Select a reason for refund:

6. You can insert details of why the refund was processed, it's internal notes for the clinic. It won't be seen by the patient:

7. Click 'Save'.

Refund a Payment on Account
Note: Before you attempt to proceed with a refund against a payment on account, the patient must first have an invoice paid with a payment on account.
1. For the initial steps, please read above then click the more options icon next to the invoice that you want to refund and select 'Refund':

2. Select the payment type to proceed with the refund: 'Payment on account'. You can only choose a type of refund equivalent to the original payment method:

3. Then select the amount to be refunded
The amount refunded can be any amount up to the original amount paid, meaning you can also make a partial refund to your patient.

4. Select a reason for refund:

5. You can insert details of why the refund was processed, it's internal notes for the clinic. It won't be seen by the patient:

6. Click 'Save'.

Note: When you refund a payment on account via an invoice against which it was paid, the money doesn't actually get paid back via an invoice it was used to pay but rather gets restored to the payment on account (please see below).
You'll have to refund on the payment on account note for the patient to receive their money.

We do not automatically notify patients of refunds so you'll have to do this manually
If you initiate a refund to a patient and do not have any money in your Semble Pay account at that moment, the system will withdraw money in order to cover this transaction.
Save a Card to a Patient's Record
You can add a payment card to a patient's record at any time from the Patients page:
1. Select the patient who you want to add a card for.

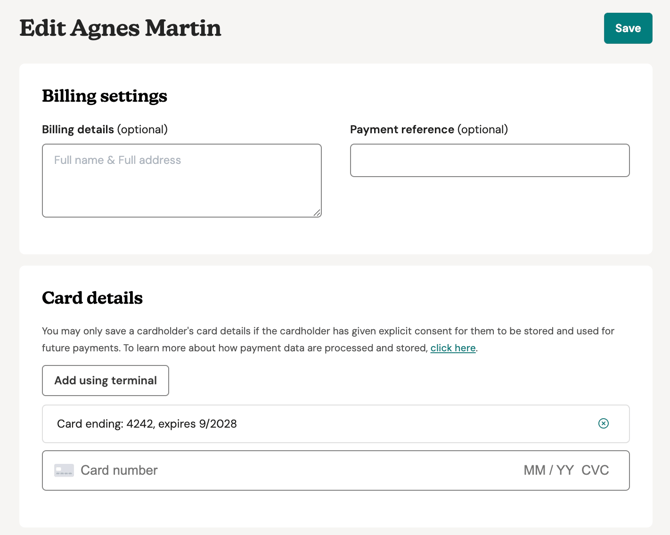
2. Click the edit icon in the top right-hand corner.

3. Scroll down to the Card details section, and enter the patient's card details.
Note: If you notice that the address field during payment shows "Zip Code" instead of "Postcode," this is controlled by Stripe based on the issuing country of the card. For example, if the card was issued in the USA, Stripe will display "Zip Code" to ensure the billing information matches what the card issuer expects.
Please reach out to your patient so that they can advise if the card was indeed issued outside the UK.

4. Click Save.
The card is now linked to the patient, and can be used to pay their invoices with.
Save a Patient's Card from a Terminal
You can use your terminal to save a patient's card details directly to their file for future use — for example, to charge them later for a missed or completed appointment. This can be done in three ways:
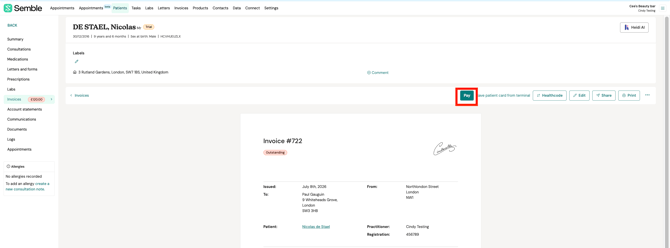
When paying an outstanding invoice:
-
Open an outstanding patient's invoice and click Pay.
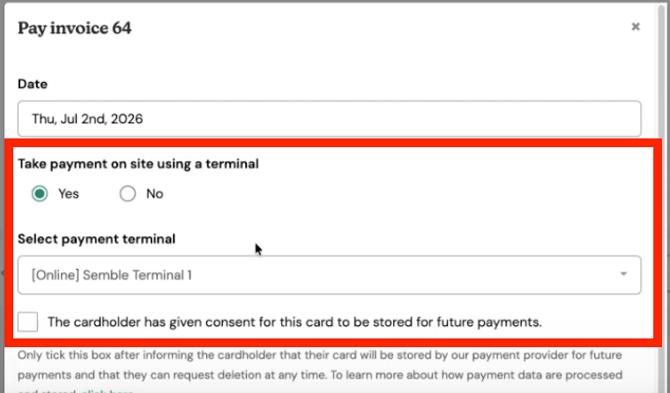
-
Select Yes to use the terminal, choose your terminal, and tick the patient consent box.
-
Click Submit and ask the patient to tap or insert their card.
-
Semble will save the card, then charge it. The invoice will be marked as Paid and the card will be stored on the patient's file.
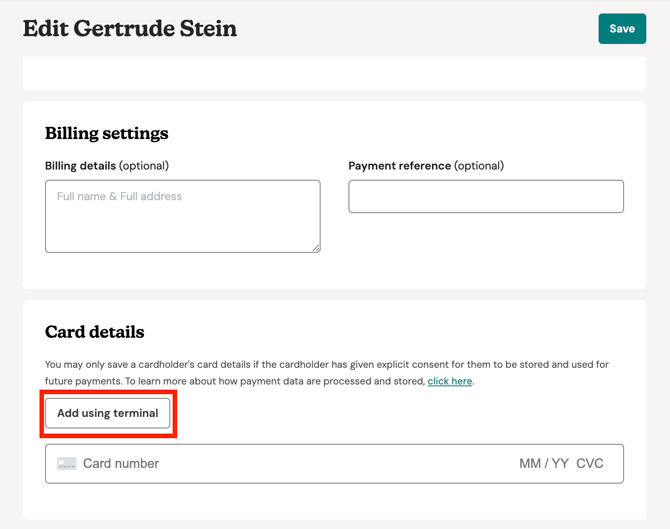
To save a card without taking payment:
-
Open the patient's record and click on "Add using terminal" in the Card details section (no invoice needed).
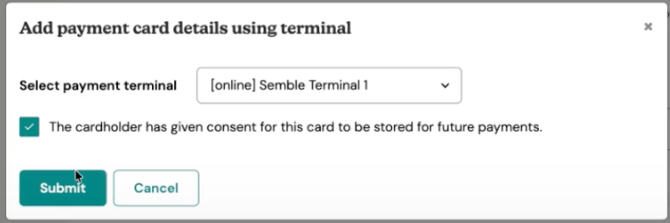
-
Choose your terminal, tick the patient consent box, and click Submit.
-
Ask the patient to tap or insert their card — no charge will be taken, but the card will be saved to their file.
With a payment on account:
Follow the same steps as above from the Payment on Account option. The payment will be recorded and the card saved to the patient's file.
NOTE: This feature is only available for practices using SemblePay with a terminal. If you are on Stripe and would like to enable this feature, contact accountmanagement@semble.io to discuss fees.
Require Card Imprint for Online Booking
A card imprint securely stores a patient’s card details during online booking without charging them. This allows you to charge the stored card later when creating the invoice after the appointment, while also helping reduce no-shows.
NOTE: Card imprint is only available if you are integrated with Semble Pay or Stripe.
If you are not sure whether you have Semble Pay integrated, please see this guide.
Steps:
A. Enable card imprint for online bookings
B. Add the Product to Your Online Booking
D. Charge a Patient After Their Appointment
A. Enable card imprint for online bookings:
-
Go to Products in your Semble account.
-
Select the product you want to edit, or create a new product.
-
Scroll down to the Online booking payment section.
-
Enable pre-payment for online booking (you must have Payment Services connected in Integrations)
-
Require card imprint for online booking (card details are collected as a guarantee - no charge is made)
-
No payment required for online bookingYou will see three payment options:

-
-
Select Require card imprint for online booking (card details are collected as a guarantee - no charge is made).

-
Click Save at the top of the page.
B. Add the Product to Your Online Booking
Once you've enabled card imprint for a product, ensure the product is added to your online booking so patients can book it online.
NOTE: Card imprint is only enforced for online bookings. Manual bookings will not require the card imprint. However, you can still manually add a patient's card details when creating a manual booking.
C. Patient Booking Experience
When a patient books an appointment online for a product with card imprint enabled:
-
They will be prompted to enter their card details during the booking process.
-
They will need to consent to the card imprint being taken.

-
Their card will be validated and stored securely—no charge will be made at this point.
D. Charge a Patient After Their Appointment
After the patient's appointment, you can charge their stored card:
-
Locate the appointment in your Appointments calendar and click the Invoice button on the appointment.

-
Click the Invoice button on the appointment. An invoice will be created with the appointment details.

-
(Optional) Add any additional line items to the invoice if relevant, then click Save.
-
Click Pay on the invoice.

-
Select the patient's stored card for payment.

-
The invoice will now be marked as paid.

Card Imprint Cancellation and No-Shows
Taking Card Payments with a Patient Card on File
You can directly take card payments for a patient's invoice.
1. Go to the Invoices page.
2. Click the Pay button next to the invoice that you want to pay.

3. Select the card from the Payment type dropdown.

4. Click Charge card.
The patient's card is charged, and the invoice is paid off.
Take Payment through Online Booking
You can configure products to require immediate payment for online bookings.
1. Go to the Products page, and select the product that you want to edit.

2. Click the edit icon in the top right-hand corner.

3. Scroll down to the Booking options section, and tick the Enable pre-payment for online booking box.

4. Click Save at the top of the page.
Now, when that product is added to an online booking form, it will ask the patient to enter their card details.
The patient can tick Remember these card details to fast track paying for the product next time they book an appointment.
Add Payment Links to Invoices
To do this, firstly go to "Settings" then click "Invoice and Payment" then scroll down to "Invoice details" and tick "Enable payment links in invoice" as below:

Now every time you send an invoice to a patient, the payment link will be included as below:

When the patient clicks on the "Pay Now" button, the payment page will open in a new tab:

Once payment is completed, the patient will see the below confirmation page:

If you go back to the invoice in Semble you will see that now that transaction is complete, the invoice is now marked as "Paid" and a "Credit card payment" with the date will appear as below:

Change the email address shown on receipts
By default, the email displayed on your receipts when a payment has been made via Semble Pay is the same as the one provided when creating your account. If you need to update this email, follow the steps below:
1. Click on Settings in the top menu.
2. From the General settings page, locate the 'General email' field.

3. Enter the new email address you'd like shown on your receipts.
4. Click Save in the top-right corner to apply changes.
If the email address you'd like to appear on your receipt is already in your general settings but not updated on your receipts yet, follow the steps below:
-
Go to the General Email field.
-
Remove the current email address completely.
-
Replace it temporarily with test@test.com.
-
Click Save.
-
Then enter the correct email address again.
-
Click Save once more.
Secure storage of card details
Understanding how client card details are securely stored is crucial for ensuring both compliance with data protection regulations and maintaining client trust. This article provides detailed information on how we handle and store client card information securely.
Collection and Storage of Card Details
Card details are not stored on Semble, instead they are securely stored by Stripe, and we only use tokens provided by Stripe to perform transactions. While the clinic does not store card details, they can instruct payments on patient's cards, as per the clinic's T&Cs.
The actual credit card numbers never reach our servers. Instead, Stripe processes and stores the card details on their secure servers. Stripe then provides us with a secure token representing the card details. This token is what we use to perform transactions, ensuring that sensitive card information is never exposed or handled by our system.
Compliance with Data Protection Regulations
Stripe complies with the Payment Card Industry Data Security Standard (PCI-DSS), which is the industry standard for securely handling credit card information. This compliance ensures that all card transactions are conducted in a secure environment and that card details are protected according to the highest security standards.
For more information on Stripe's security please click here.
Ordering your Terminal
Note: Terminal WiFi networks must use WPA/WPA2/WPA3-Personal or WPA2/WPA3 EAP-PEAP Enterprise encryption and must be password protected to ensure secure terminal connectivity.
If your network does not support these security requirements, the terminal may not connect correctly and the network may not be suitable for terminal use.
Terminal are ordered through Semble, please email support@semble.io for more information on this.
- Your existing terminal will continue to be supported until 1 February 2031
- You do not need to replace it immediately
- All functionality will remain available until the end-of-life date
-
Terminal Cost: £229 + Shipping Costs + VAT
-
Shipping Options:
-
Standard Delivery: Starts from £21 (~8 business days)
-
Priority Delivery: Starts from £35 (~4 business days)
-
-
Final Shipping Prices:
-
Calculated at the point of order
-
Included in the final invoice
-
May vary based on location, order date, and quantity of terminals ordered
-
Note: Our services are powered by Stripe, which does not deliver to non-mainland territories of the United Kingdom.
Unfortunately, this means we are unable to process shipments to locations such as the Isle Of Man. For more information, please refer to Stripe’s Availability for Outlying Territories.
Setting up your Terminal
1. Charge the device -
- Please charge the device to 50% before use
2. Turning on the Device:
- Press the ⏻ button located on the right-hand side of the device.
3. Connecting to the Internet:
- Once powered on, the device will prompt you to choose a language and connect to the internet.
- You will see a screen with the message: “downloading updates."
4. Register the reader:
- The device will then prompt you to "Register this reader".
- Please send us the 3 words displayed on your screen (eg: apple-watch-disabled)
- Let us know the name you would like your terminal to have in our system (eg. Terminal Reception 1). If you do not communicate any name, we will name it "Terminal 1".
The device will start updating to the latest version, which may take a few minutes (up to 45 minutes in some cases).
Please note that the codes expire every 30 minutes, so please let us know when you will send it so that we can ensure that we do not miss it.
Once registered, we will confirm this with you and let you know the next steps.
Using your Terminal
Note: Terminal WiFi networks must use WPA/WPA2/WPA3-Personal or WPA2/WPA3 EAP-PEAP Enterprise encryption and must be password protected to ensure secure terminal connectivity.
If your network does not support these security requirements, the terminal may not connect correctly and the network may not be suitable for terminal use.
1. Go to a patient's invoice
2. Click "Pay" on an outstanding invoice.
The below pop-up will appear, if you wish to use your terminal click "Yes", fill in the details as required then click "Submit":

3. You will see the below pop-up appear:

4. At this point, go back to your terminal and you will see the total amount due, "Tap, insert, or swipe to pay."
5. If payment is successful you will see the below pop-up:
