
Xero is an online software tool that simplifies accounting tasks for businesses. When this integration is set up, invoices and payments created in Semble are automatically uploaded to Xero, even if payment is not recorded at the time of the invoice creation.
NOTE: This is a one-way sync. Data flows from Semble to Xero only. Anything created or edited directly in Xero will not be reflected in Semble.
In this article
Handling multiple line items with different Xero information
What syncs from Semble to Xero
What does not sync from Semble to Xero
Reconciling Xero with Semble Pay
Configure Xero for Semble
Requirement: Before you attempt to integrate Xero with Semble, you must first set up a Xero account: www.xero.com/uk/signup/
Complete the following steps in your Xero account to ensure that you are ready to integrate.
Adding your sales account
Xero comes with 3 default sales (revenue) accounts, so you often don’t need to create anything new.
Default sales accounts:
-
200 – Sales (normal business income)
-
260 – Other Revenue (non-recurring income)
-
270 – Interest Income (interest received)
If you use these or already have revenue accounts set up in Xero, no further setup is needed.
If you do need to create more accounts, you can set this up by following these steps.
Adding your bank account-
In Xero, go to Accounting > Bank accounts (or Charts of accounts)
-
Click Add Bank account and select your bank account.
-
If your bank account isn't listed, select Add without bank feed in the top-right corner. This allows you to manually import your bank transactions into Xero from your bank account.
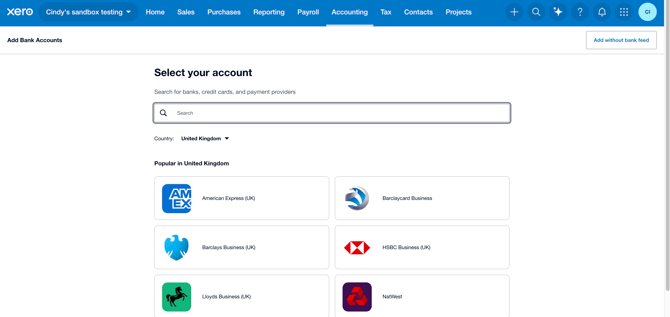
IMPORTANT: Regardless of which bank account you're connecting, always ensure a bank account code has been added in Xero. This is required for the account to sync with Semble. The code can be any numeric value, as long as it is at least 3 digits long.
Default integration settings
Once you have set your sales and payment accounts up in Xero, you are ready to integrate your Xero account on Semble:-
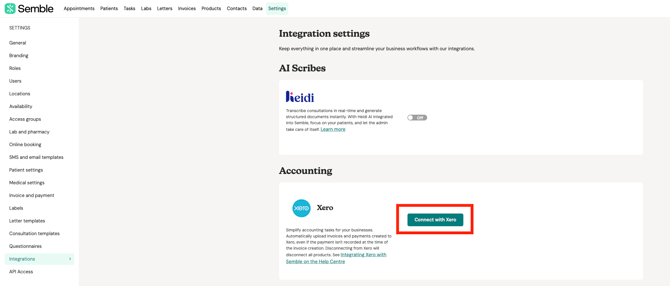
In Semble, go to Settings > Integrations.
-
Click Connect with Xero.
-
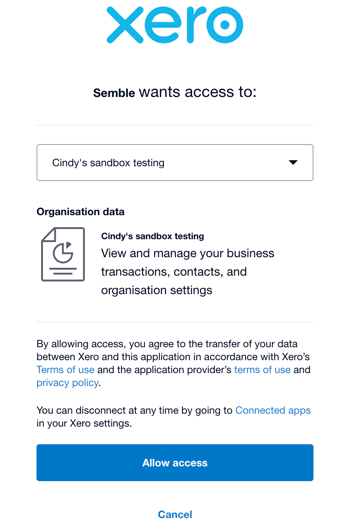
Log in to your Xero account, select the organisation you'd like to link and click Allow access.
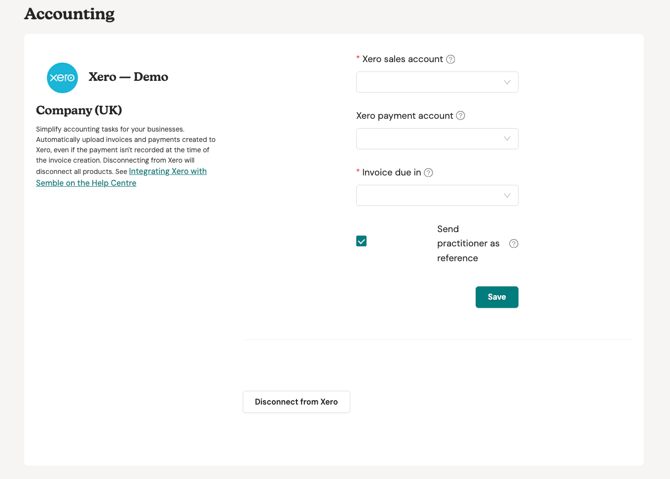
4. The page will refresh and the integration will be added to Semble. You will then need to configure your settings.
-
Xero sales account — where both paid and unpaid invoices are uploaded in Xero (e.g. 200 - Sales).
-
Xero payment account — where your payments are recorded in Xero (e.g. 090 - Bank Account).
-
Invoice due in — how long patients have to pay their invoice.
-
Send practitioner as reference — tick this box to have the clinician's name appear in the reference field on invoices sent to Xero.
-
Upload products (this setting appears when you have saved the above settings first) — This option is used when you want to sync existing products retrospectively from Semble into Xero.
Once this initial sync is done, any new products created going forward in Sembly will automatically be added to Xero each time they are created.
Please note that even if you click the “Upload products” button multiple times, products will only be uploaded once and will not duplicate.
NOTE: Click Save to keep any changes made to these settings.
Account mapping
Default vs product-specific sales accounts
What is a sales account?
The sales account records the value of the products or services you have sold. It measures your income, regardless of whether the customer has paid yet.
When you issue an invoice, you have earned the revenue, so it is recorded in your sales account immediately.
The invoices always remain recorded in the sales account, whether they are paid or unpaid. Once the customer pays, a separate entry is created in the payment account to record the cash received.
You can also use extra sales accounts to categorise your revenue in Xero's chart of accounts — for example, separating physiotherapy income from GP consultation income by creating different sales accounts and assigning them to your products based on the category (see more information on how to set up your product specific Xero settings).
In Semble, you set a default sales account under Settings > Integrations > Xero. This default applies to all invoices unless a product has been configured with its own specific sales account.
To add a new sales account in Xero:
-
In Xero, go to Accounting > Chart of Accounts.
-
Click Add Account.
-
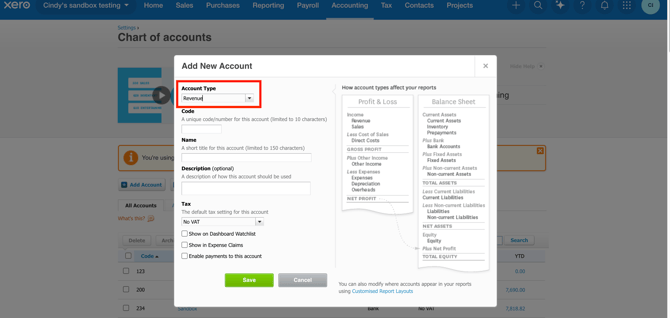
Set the account type to Revenue.
-
Complete the remaining fields and click Save.
- The new sales account are now visible on Semble.
IMPORTANT: When creating new sales accounts, the account type must be set to Revenue in Xero. Accounts of any other type (e.g. "Sales") will not appear in the sales account dropdown in Semble.
What is a payment account?
The payment account records the money that customers actually pay.
When the customer pays your invoice, the payment is recorded in your payment account. This does not create new revenue—it simply settles the amount that was already recorded when the invoice was issued.
When a payment is received in Semble, it is sent to this account in Xero, allowing Xero to mark the invoice as paid.
To add a new payment account in Xero:
-
In Xero, go to Accounting > Chart of Accounts.
-
Click Add Bank Account.
-
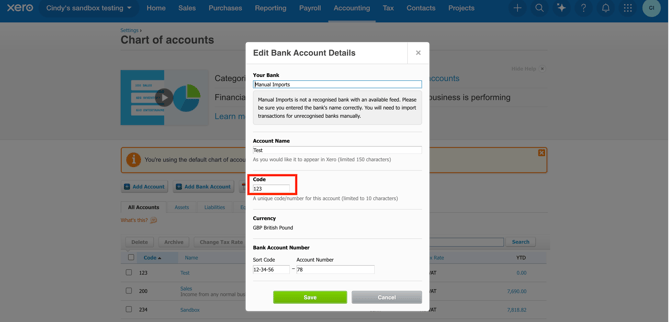
Add an account code — this is mandatory for the account to appear in Semble.
-
Click Save.
- The new payment account are now visible on Semble.
WARNING: The account code field is mandatory for the payment account to sync to Semble, even if Xero marks this field as optional. Without an account code, the account will not appear in the payment account dropdown in Semble, and paid invoices will remain as Awaiting Payment in Xero.
Default vs product-specific sales accounts
You can set a default sales account in Settings > Integrations > Xero. This account will be used for all invoices automatically — you do not need to configure each product individually if all of your revenue goes to the same account.
However, if your practice has multiple revenue streams (e.g. you want to report on different types of consultations or treatments separately in Xero), you can configure individual products to use a specific sales account instead of the default.
Set up your product specific Xero settings:
1. Go to the Products page.
2. Select the product you want to configure Xero with.

3. Click the edit icon in the top right-hand corner.

4. Scroll down to the Xero section, then use the two dropdowns to select the Sales Account and Payment Account that you want to link the product to.

5. Click Save.
Once configured, whenever that product is added to an invoice, it will be processed by the Xero account you have assigned to it.
Handling multiple line items with different Xero information
For a Xero invoice to be correctly processed, all products within the invoice must share the same Payment Account setting.
If an invoice contains two or more line items where some products have different payment accounts assigned, the entire invoice will default to the payment account set up in Settings > Integrations > Xero (on Semble).
NOTE: While the Payment Account must be consistent across all line items on a single invoice, the Sales Account can differ between line items.
The payment account must stay the same across an invoice because it represents a single cash transaction, while sales accounts can differ per line item because each item may represent a different type of revenue.
Taxes/VAT
Semble maps its tax rates to the corresponding tax rates in Xero. Only the tax rates available in Semble will be matched. The supported tax rates are:
| Tax rate in Semble | Maps to in Xero |
|---|---|
| VAT on income (20%) | 20% (VAT on Income) |
| VAT on income (5%) | 5% (VAT on Income) |
| Exempt income | Exempt |
| Zero rated income | Zero Rated |
| No VAT | No VAT |
NOTE: Even if Xero has additional tax rates not listed above, these will not be available in Semble and therefore will not sync. Only the tax rates shown above are supported by the integration.
What data is sent to Xero?
What syncs from Semble to Xero
What doesn't from Semble to Xero
The data flow between Semble and Xero is one-way. Semble sends data to Xero — Xero does not send data back to Semble.
What syncs from Semble to Xero
The following data is automatically sent from Semble to Xero:
- Billed to → Contact name on the invoice
- Email Address→ Email address of the contact named on the invoice
- Invoice number → Invoice number
- Line item description → Line item description
- Product code → Item code
- Unit price → Unit amount
- Quantity → Quantity
- VAT (limited to VAT rates available in Semble) → VAT
- Sales account → Account code on the line item
- Payment account → Bank account for payments
- Invoice status (Paid / Outstanding) → Invoice status (Paid / Awaiting Payment)
- Invoice due date → Due date
- Practitioner name (if enabled) → Reference field
- Voided invoices → Voided in Xero
- Credit notes → Credit notes in Xero
What does not sync to Xero
Because the integration is one-way (Semble → Xero), the following are not synced:
-
Refunds — refunds processed in Semble are not sent to Xero. You will need to record these manually in Xero. See Refunds & credit notes in the section below.
-
Changes made after an invoice is marked as paid in Xero — once an invoice is marked as paid in Semble and sent to Xero, further payment changes in Semble will not update the Xero record.
-
Anything created directly in Xero — invoices, contacts, credit notes, or payments added in Xero will not appear in Semble. Semble is always the source of truth.
-
Historical invoices — invoices created in Semble before the integration was connected will not sync retrospectively. See the FAQ section for workarounds.
Note: Any invoice that has been marked as paid in Semble and sent to Xero cannot be edited in Semble anymore. If you attempt to edit a paid invoice that has already been synced to Xero, you will receive the below error message:
Invoice update failed. To update fields on a paid invoice line item, you must supply a LineItemID, The status AUTHORISED cannot be applied to the invoice because it has payments or credit notes allocated to it.
Products and Xero
If you are integrated with Xero, there are a few important things to keep in mind when creating and managing your products in Semble.
Product updates sync to Xero
Any manual updates you make to individual products in Semble will automatically be reflected in Xero.
Updating lab product lists
Bulk updates to lab product lists are not currently synced to Xero, as the volume of items in most lab lists exceeds the maximum number of product updates supported by the Xero integration at this time.If you need to update a lab list, we recommend deleting the existing lab list and re-uploading it to ensure your product data remains accurate in Xero.
Do I need to use product codes?
Yes. Each product should have a product code. The code can be anything you choose, however we recommend avoiding special characters, as some are not accepted by Xero.
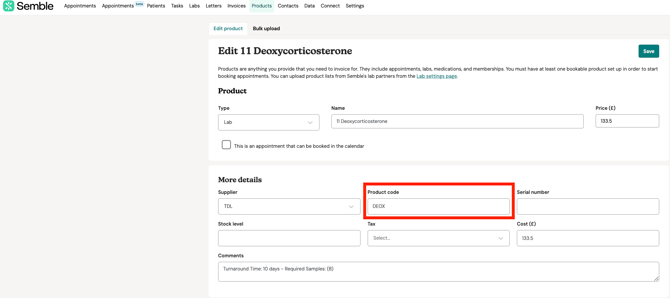
NOTE: Duplicate product codes are not recommended for the Xero integration. While Semble may allow duplicate codes, using them will cause issues with your Xero integration. Ensure each product has a unique code.
Invoice creation and sync
Once your Xero integration is configured, invoices created in Semble are automatically synced to Xero. This eliminates the need to manually recreate invoices, helping keep your financial records accurate and up to date across both systems.
1. Create the invoice in Semble and save it to Xero 0:00
In Semble, an invoice can be created either:- Manually, or
- Automatically from an online booking
- Save the invoice to Xero so it appears in the Xero invoices list.
- After saving, you should be able to see the invoice in Xero.
2. Mark the invoice as paid in Semble 0:30
- Once the patient has paid, open the invoice in Semble.
- Click Pay.
- Select the payment method, in this case patient card.
- Semble will then mark the invoice as paid.
3. Confirm the payment has synced to Xero 0:40
- Go back to Xero and refresh the page.
- The invoice should now show as paid in Xero as well.
- This confirms that the payment status has synced correctly between Semble and Xero.
4. Prepare to reconcile payouts later 0:53
- A few days later, you will receive your payouts.
- The next step is to reconcile those payouts.
How invoices are sent to Xero
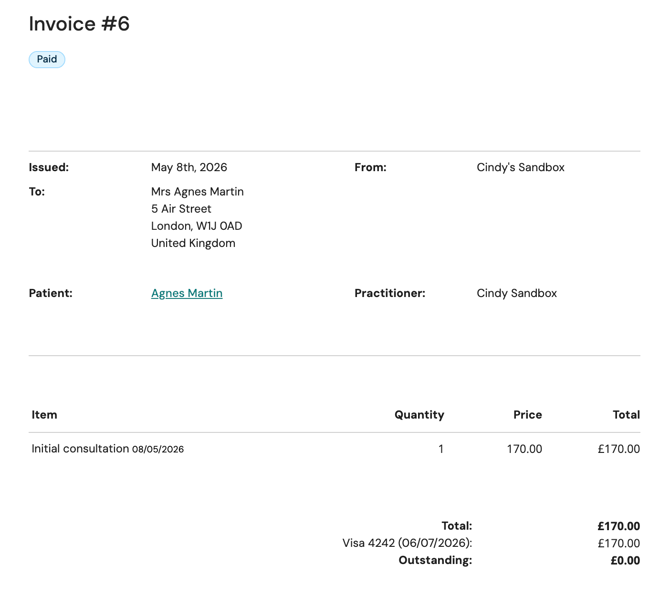
Each invoice arrives in Xero with the following information:
-
Billed to contact — If the invoice was billed to the patient it will be the patient but if it was billed to a third party it will be the third party's name.
-
Invoice number
-
Line items — product name, product code, quantity, and unit price
-
Tax rate per line item
-
Sales account
-
Practitioner name in the reference field (if enabled in Settings > Integrations > Xero)
-
Invoice statuses (Awaiting payment or Paid)
Invoice in Semble |
|
Invoice in Xero |
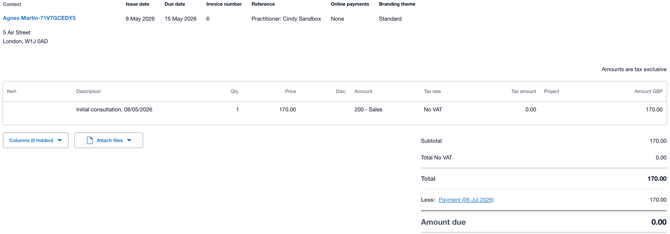
IMPORTANT: The integration does not allow you to choose which invoices are sent to Xero. If your practice is connected to Xero, all invoices created in Semble will be automatically synced. It is not currently possible to exclude individual invoices from the sync.
Reconciling Xero with Semble Pay
This guide explains how to reconcile SemblePay payout transactions in Xero by matching bank feed lines to payout details, identifying the related invoices, and recording any processing fees correctly. Following this process ensures payouts are reconciled accurately and bank fees are assigned to the proper expense account and contact.
1. Create a contact for the payment provider 0:00
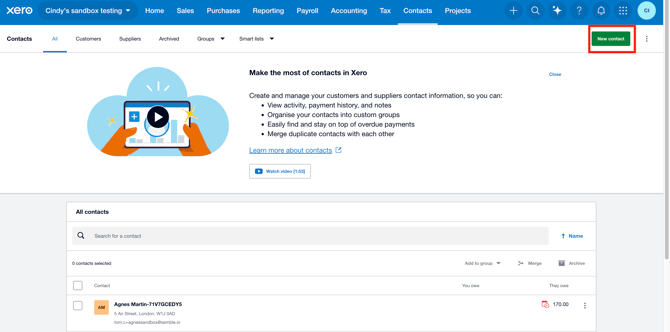
- Go to All Contacts in Xero.
- Create a new contact for the payment provider that takes the fee. (eg. Semble Pay)
- Save the contact so it can be used later when assigning bank fees during reconciliation.
2. Open the bank reconciliation screen 0:19
- Return to the Home page in Xero.
- Look for the number of items still needing reconciliation in the relevant account.
- Click Reconcile X items to open the bank feed.
- On the left, you’ll see the bank feed lines containing payouts.
- On the right, you’ll match those lines with the related payments.
3. Find the payout in Semble 0:53
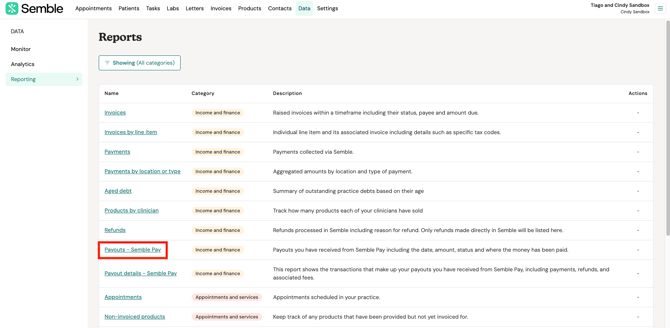
- In Semble, go to the Reporting page.
- Select Payout SemblePay.
- Adjust the date range to match the date you received the payout.
- Click Apply.
4. Compare the payout total with the bank feed line 1:13
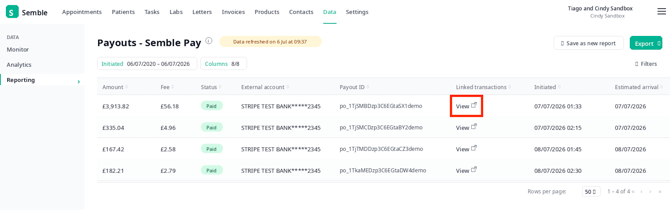
- Check the payout amount shown in Xero.
- Review the payout list on Semble to find the corresponding payout and click View on the relevant payout to see the payments linked to that payout.
5. Use the payout details report to identify the linked payments 1:40
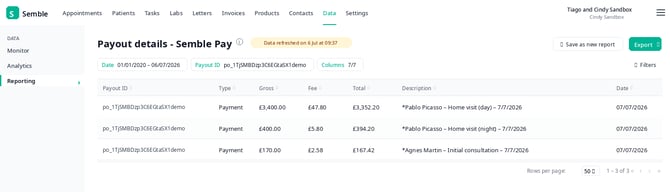
- In the payout details, review:
- Gross amount
- Fee
- Total received / net amount
- Use the patient name and service date in the description to identify the related payment in Xero.
- This information helps you match the payout to the correct payments.
6. Match the invoices in Xero 1:59
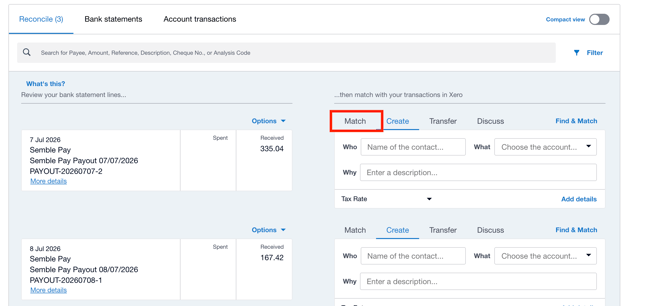
- Go back to Xero and click Match on the bank feed line.
- Search for the related payments by:
- Name
- Reference
- Amount
- Match the invoices for the relevant patients.
7. Account for the fee difference 2:41
- After matching the invoices, you may see a discrepancy.
- In the demo, the difference is £56.18.
- This happens because the invoice reflects the full amount paid by the patient, while the payout is the net amount after the provider fee is deducted.
- To fix this, add a Bank Fee adjustment for the fee amount.
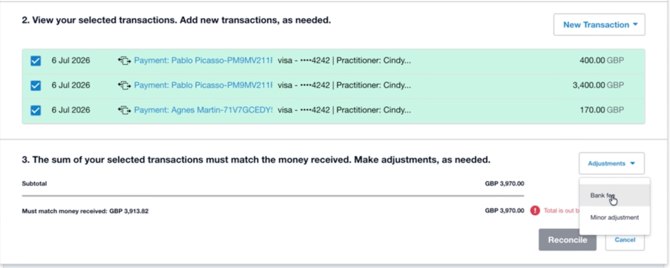
8. Assign the fee and reconcile 2:59
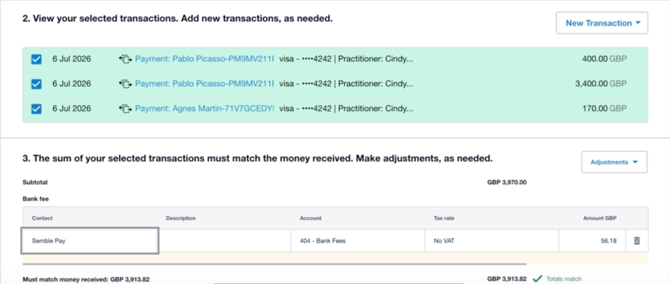
- Enter the fee amount so the difference goes back to xero.
- Choose a tax rate if needed.
- Select an expense account for the fee.
- Choose the Merchant fees contact you created earlier.
- Click Reconcile to complete the transaction.
9. Confirm the reconciliation is complete 3:34
- After reconciling, Xero will show fewer items left to reconcile.
- Return to the Home page to confirm the reconciled amount is reflected.
- The payout has now been successfully matched and the fee has been recorded.
Reconciling Xero with Stripe
If you use Stripe as your payment provider and are integrated with Xero, you can reconcile your Stripe payments directly in Xero. Refer to Xero's official guide for step-by-step instructions: Reconcile Stripe payments – Xero Central
Refunds & credit notes
Semble and Xero handle refunds differently, which is why refunds do not automatically sync between the two platforms.
| Semble | Xero | |
|---|---|---|
| Refund | An operational action that sends money back to the patient. Recorded against the invoice in Semble. | Xero does not have a standalone refund feature. Refunds are handled through credit notes. |
| Credit note | An accounting document created in Semble to reduce the amount on an invoice. Syncs to Xero automatically. | An accounting document that reduces or reverses part or all of an invoice. Does not automatically send money back to the patient. |
Because a refund in Semble has no direct equivalent object in Xero, it cannot be automatically synced. The integration only syncs credit notes — not refund transactions.
Recommended workflow for refunds
To keep your Xero account accurate after processing a refund in Semble:
-
Process the refund in Semble so the patient receives their money back.
-
Manually record the accounting impact in Xero by creating a credit note against the original invoice, then allocating that credit note to a refund payment.
For step-by-step instructions, refer to Xero's guide: Process a customer or supplier refund – Xero Central
Editing records
What can be edited in Semble after the invoice is sent to Xero:
-
Before the invoice is paid: All fields on the invoice can be edited in Semble and the changes will be reflected in Xero automatically.
-
After the invoice is paid: Once a payment has been recorded against an invoice in Semble, no further changes can be made to that invoice in Semble.
What can be edited in Xero:
IMPORTANT: Because this is a one-way sync, any changes made directly in Xero will not be reflected in Semble. Always make changes in Semble where possible.
Xero has limited editing capabilities on paid or partly-paid invoices. The following fields can be edited without removing the payment:
-
To (contact name)
-
Due date
-
Invoice number
-
Reference
-
Branding theme
-
Description
-
Account
-
Tracking
-
Project
You can also attach files and change the payment service after payment has been made.
To edit any other fields, you will need to remove the payment in Xero first, make your changes, and then re-apply the payment.
Disconnect from Xero
Disconnecting the integration will not remove any invoices that have already been synced to Xero. However, invoices created while disconnected will not be sent to Xero and cannot be synced retrospectively once you reconnect.
If you reconnect to a different Xero organisation, invoices linked to the previous organisation will remain in that organisation on your Xero account but you can also add them to the new organisation.
To disconnect the integration, go to Settings > Integrations and click Disconnect from Xero.

Troubleshooting
- My sales account isn't appearing in the dropdown
- My payment account isn't appearing in the dropdown
- An invoice didn't sync to Xero
- A payment didn't update in Xero
- Error: Invoice # must be unique
- Error: Duplicate contact
- Error: Item code is not valid
- Error: Limit of invoices you can approve
- Error: Invoice update failed. To update fields on a paid invoice line item, you must supply a LineItemID, The status AUTHORISED cannot be applied to the invoice because it has payments or credit notes allocated to it.
My sales account isn't appearing in the dropdown
Check that the account has been created in Xero with the account type set to Revenue. No other account type will appear in the Semble sales account dropdown. To verify, go to Accounting > Chart of Accounts in Xero and check the type assigned to the account.
My payment account isn't appearing in the dropdown
Check that you have added an account code to the payment account in Xero. Although Xero marks this field as optional, it is mandatory for the account to appear in Semble. Without it:
-
The account will not show in the payment account dropdown in Semble.
-
Even if your integration appears to be working, paid invoice statuses will not update in Xero — all invoices will show as Awaiting Payment.
To fix this, add an account code to the relevant account in Xero under Accounting > Chart of Accounts, then check the dropdown in Semble again.
An invoice didn't sync to Xero. How can I resend it?
-
Check the error message displayed on the invoice in Semble — this will usually indicate what went wrong.
-
If you are unsure what the error means, contact support@semble.io with the error details.
-
Once the underlying issue is resolved, click Edit on the invoice in Semble, make no changes, and click Save to re-trigger the sync.
- Refresh the Invoices page on Xero. The invoice will then appear.
A payment didn't update in Xero
Check that you have set up a payment account in your Xero settings in Semble (Settings > Integrations > Xero). Without a payment account configured, paid invoice statuses will not be sent to Xero.
Error: Invoice # must be unique
Delete the duplicate in Xero or edit the number on your invoices in Semble by contacting support@semble.io
Error: Duplicate contact
Error: Item code is not valid
Product codes must match exactly on both platforms and they must not contain special characters. Please check your products on Xero and on Semble.
Error: Limit of invoices you can approve
Xero plan/trial limit, contact Xero.
Error: Invoice update failed. To update fields on a paid invoice line item, you must supply a LineItemID, The status AUTHORISED cannot be applied to the invoice because it has payments or credit notes allocated to it.
Paid invoices can't be edited via the integration; void and recreate, or edit directly in Xero
Frequently asked questions
- Will my existing invoices sync when I first connect Xero?
- Can I manually sync historical invoices?
- I have invoices from a previous EHR already in Xero. Can I still connect Xero to Semble?
- Can I change the Xero organisation after connecting?
- Why don't my Semble Pay payouts match my invoices in Xero?
Can my Xero account be connected to multiple Semble accounts?
No. A Xero account can only be connected to one Semble account at a time. If you connect your Xero account to a different Semble account, you will automatically be logged out of the previous connection.
Will my existing invoices sync when I first connect Xero?
No. Only invoices created after the integration is connected will sync automatically. You can however import your existing invoices into Xero manually using Xero's import tool: Import customer invoices – Xero Central
Can I manually sync historical invoices?
Yes, if you have a small number to resend. Open each invoice in Semble, click Edit, make no changes, and click Save. This will trigger a sync to Xero.
NOTE: With this method, invoices will be sent to Xero but payment status will not be updated. Invoices that have been paid in Semble will still appear as Awaiting Payment in Xero. You will need to update the payment status in Xero manually.
I have invoices from a previous EHR already in Xero. Can I still connect Xero to Semble?
Yes. However, Xero does not accept duplicate invoice numbers. If your previous invoice numbers may conflict with Semble's numbering, contact support@semble.io before connecting — the team can assist with adjusting your invoice sequence.
Can I change the Xero organisation after connecting?
Yes. Disconnect the integration from Settings > Integrations and reconnect with your new Xero organisation. Invoices linked to the previous organisation will remain there. You can import them into your new organisation using: Import customer invoices – Xero Central
Why is my sales account not appearing in the dropdown?
The account must be set to type Revenue in Xero.
Why is my payment account not appearing in the dropdown?
The account must have an account code added in Xero.
Why don't my Semble Pay payouts match my invoices in Xero?
Reconciling Semble Pay payouts with Xero is a manual process — it does not happen automatically. You can use your Payout Report in Semble (Data > Reporting > Payout – Semble Pay) to match payments against your Xero records. See also: Semble Pay FAQ