
After your free trial, contact benwebber@heidihealth.com for plans with 1-50 clinicians.
For plans with more than 50 clinicians, contact henry@heidihealth.com.
For more details, visit Heidi's pricing page or contact the Heidi team.
In this article:
How to Dictate using the Heidi Integration in Semble
Push Heidi note into a Semble consultation note
Recording allergies with Heidi
Push Heidi note into a Semble letter
Troubleshooting
Linked Articles:
Dictating in Semble with Your Browser (If you are not integrated with Heidi)
Note: Heidi is an independent platform and not a part of Semble. Any agreements or contracts with Heidi need to be managed directly through their team.
Heidi Health is committed to maintaining the highest standards of security and privacy for patient data. You can learn more about our security practices and privacy commitments in the Heidi Trust Centre.
Follow these steps to set up the Heidi integration for dictation in Semble:
1. Before using Heidi, you need to ensure it is enabled in your settings:
-
Go to Settings.
-
Click on Integrations.
-
Find the Heidi integration toggle and switch it on.
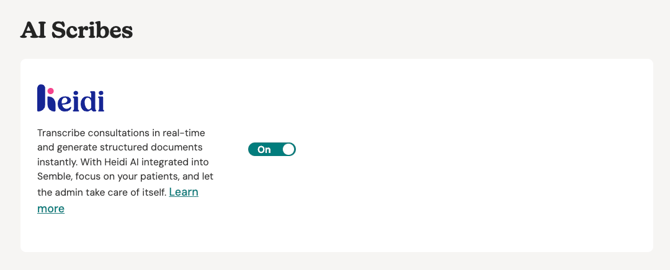
Once enabled, you can proceed with the rest of the setup.
If you do not see the Settings tab in Semble, this means that your user role does not have the necessary permissions to access it.
To gain access, you will need to ask a Practice Manager with the appropriate permissions to update your role settings. They can adjust your access by following the steps outlined here.
If you are a manager and cannot see the Heidi toggle in your integration settings contact support@semble.io to enable it for your practice.
2. Access the Patient’s File: Go to the file of the patient for whom you want to dictate.
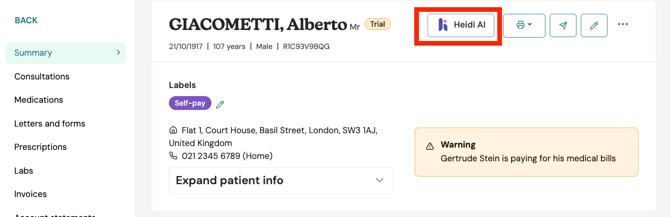
3. Click on the Heidi AI Logo: Locate and click on the Heidi AI logo within the patient’s file.

4. The acknowledgement modal will pop up, click "Ok, open Heidi". More information on Heidi's security can be found here.
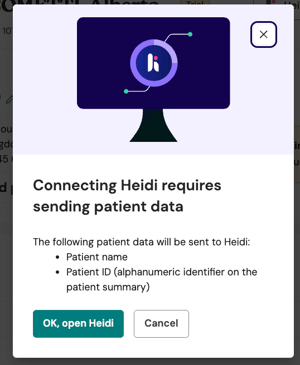
5. Allow Microphone Access: When prompted, allow Semble to access your microphone to enable dictation.
6. Redirect to Heidi’s Website: At the bottom right corner of the screen, click on “Continue in a new window” to be redirected to the Heidi website.
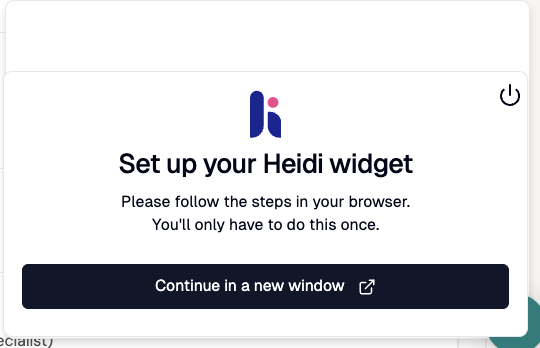
7. Log in or Create a Heidi Account
- If you already have a Heidi account, log in.
Note: You can currently only link one Semble account to one Heidi account at the moment. If you have multiple users you can create them as users in Heidi, using the same email address they use on Semble.
- If not, create an account on the Heidi website: Heidi Health.
Note: When creating your Heidi account (if you don’t already have one), please use the same email address as the one you use to log in to Semble.
If you need to use a different email address, please contact support@heidihealth.com beforehand.
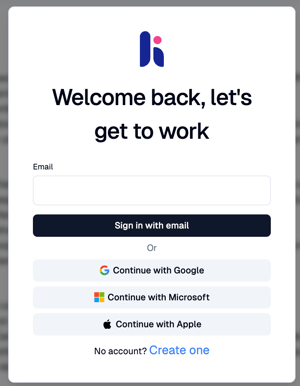
8. Enable the Integration: Once logged into Heidi, click on “Use Heidi on Semble” to activate the connection.
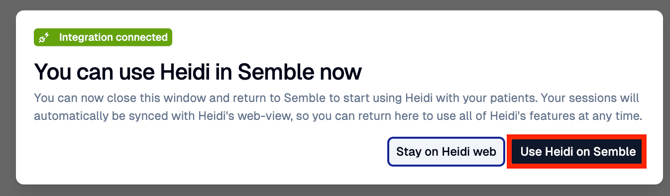
9. Start dictating: You will be redirected back to Semble, where the Heidi integration will now be ready for use.
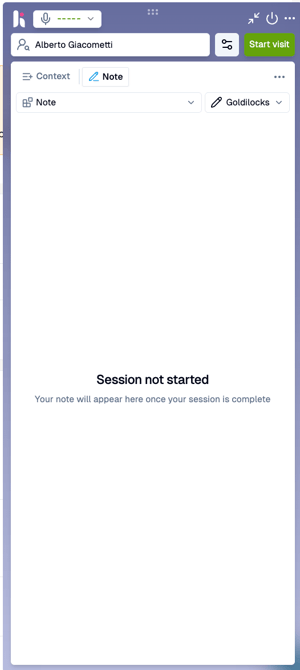
How to Dictate Using the Heidi Integration in Semble
Follow these steps to use the Heidi integration for dictation in Semble:
1. Start the Integration: Click on the Heidi AI logo from your Semble interface to begin.
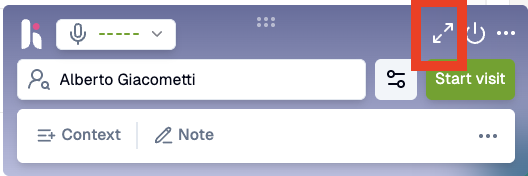
2. Maximise the Window (optional): You can maximise the window for a larger view by clicking on the maximise icon.
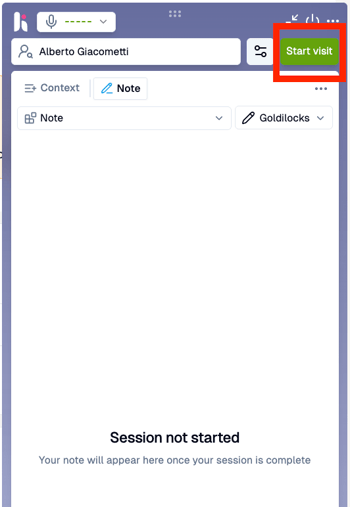
3. Begin Your Consultation: Press "Start Visit" to initiate the session and begin your consultation.
Note: Heidi works seamlessly with video consultations, but your patient's voice must be picked up by the microphone from your computer's speakers.
When using a headset, your microphone will not be able to detect the patient's voice from the speakers, so only your voice will be captured in the transcript.
If you need to use a headset, you can transcribe the consultation using the Heidi desktop app instead.
4. Conduct the Consultation: Proceed with your consultation as usual. Heidi will transcribe and process the discussion in real time.
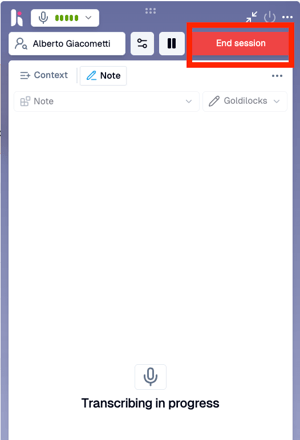
5. End the Session: When the consultation is complete, click on "End Session".
6. Choose a Template: After ending the session, you’ll be prompted to use one of the templates from your Heidi account.
Note: Template management is available only via your Heidi account. Visit Heidi Health to manage templates.
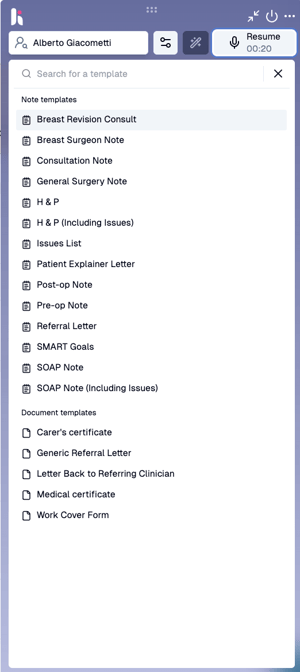
During the trial, all users will have access to the full range of templates, including those not typically included in the standard offering.
This exclusive access allows you to explore and utilise all available templates to best suit your needs.
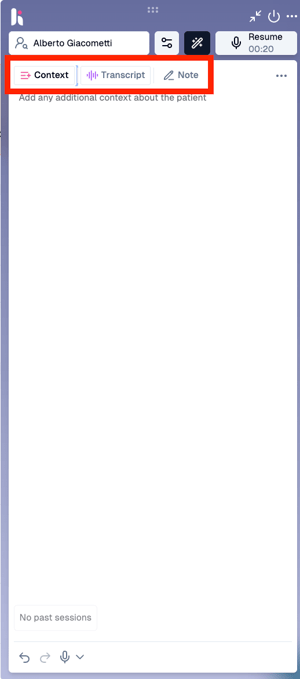
7. Add Context or Review Notes:
-
Context: Add additional patient context or paste relevant consultation notes.
-
Transcript: View the full transcript of the session.
-
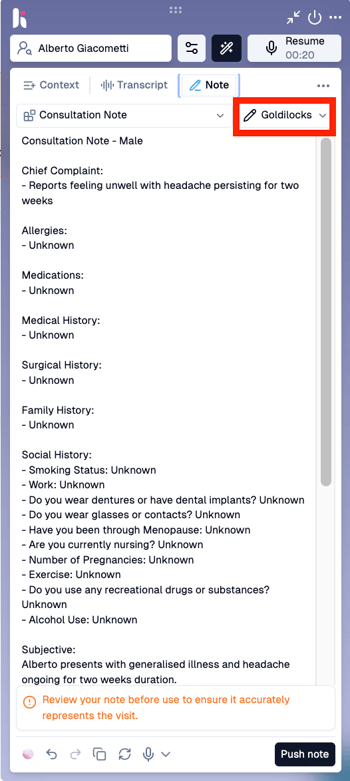
Note: View the consultation information formatted according to the selected template. If you’re unsure which template fits best, you can switch between templates to find the most suitable option using the dropdown options.
Important: Always review your note before use to ensure it accurately represents the visit.
8. Adjust Voice Style (optional):
-
Use the second dropdown menu to select a voice style that best suits your consultation tone.
-
To learn more about the available voice styles and how they work, refer to this article.
Push Heidi note into a Semble consultation
You can send a Heidi note directly into a Semble consultation. The note is added to an Ambient Scribe Notes section, so you won't need to copy and paste it manually.
Note: Only a Heidi tab with a pencil icon can be pushed into a Semble consultation. If you need to regenerate the consultation note with another template, see Switch between Note and Document templates.
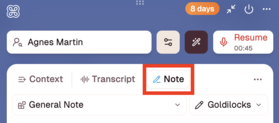
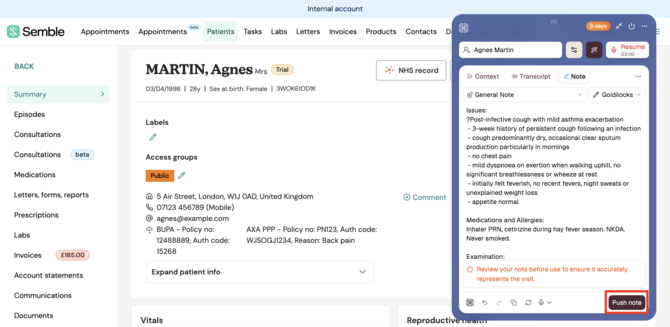
1. Once your consultation is completed and you have selected your note template (see steps above), click on 'Push note'.
See Heidi's Help Centre to learn how to set a default template.
Note: If you have already generated a document template and need to change to a note template, see here: Switch between Note and Document templates.
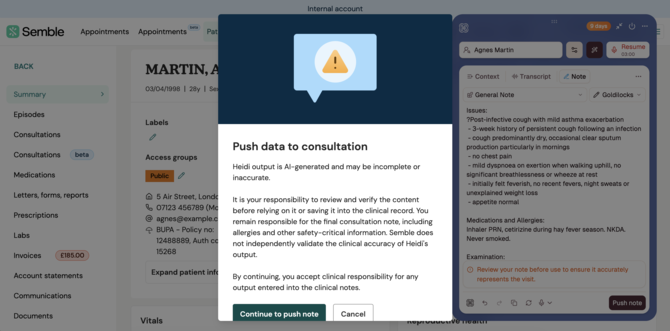
2. Click on Continue to push note. By doing so, you accept clinical responsibility for the output entered into clinical notes (this is only required the first time).
3. There are three workflows available when pushing a note: add to a new consultation from any page, add to an existing consultation from any page, or add to your current consultation that you're still editing;
Add to new consultation:
1. Select New consultation.
2. Click on Push.
3. See that an Ambient scribe note section has been added as a new consultation.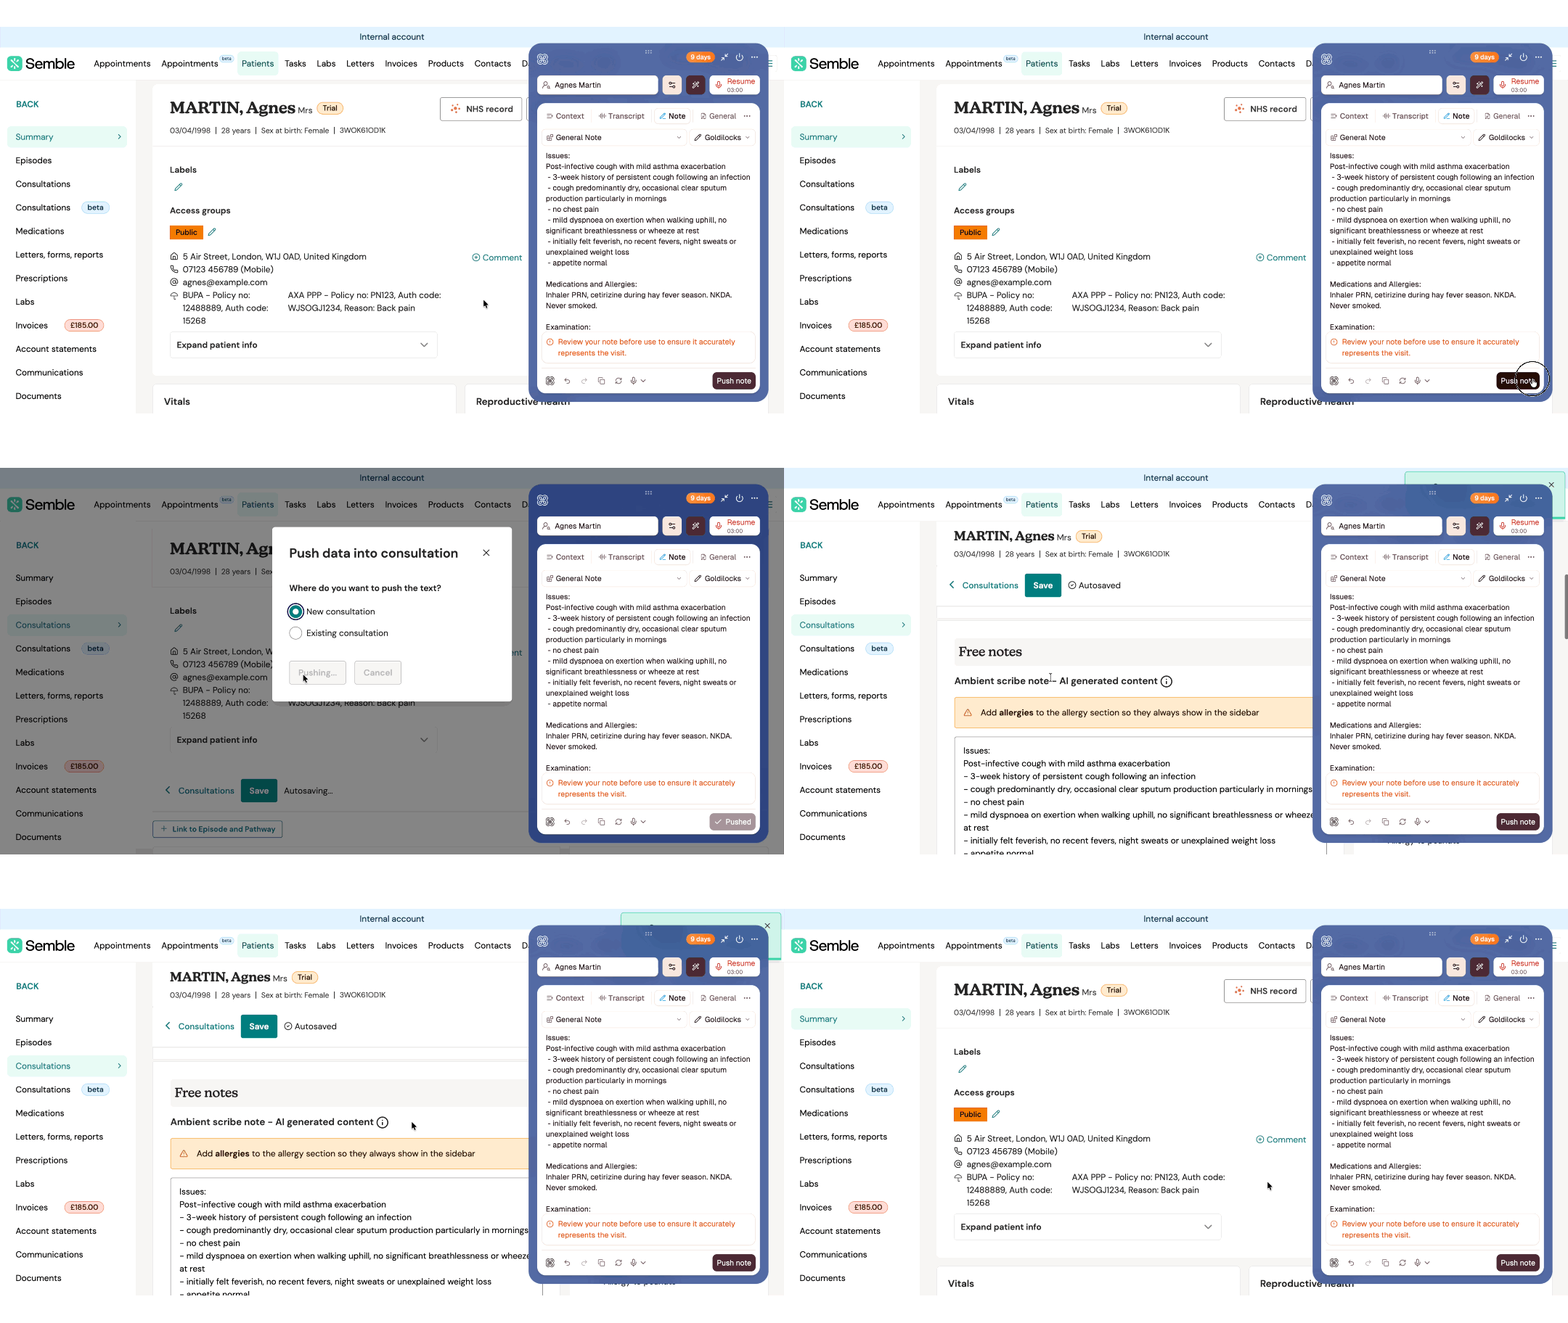
4. Make any edits necessary, record any allergies, or issue medications/products before finishing your note.
Please see more important information on recording allergies here: Recording allergies with Heidi
Add to existing consultation:
1. Select Existing consultation.
2. Select the consultation note to push to from the dropdown options.
3. Click on Push.
4. See that an Ambient scribe note section has been added to the bottom of the existing note.
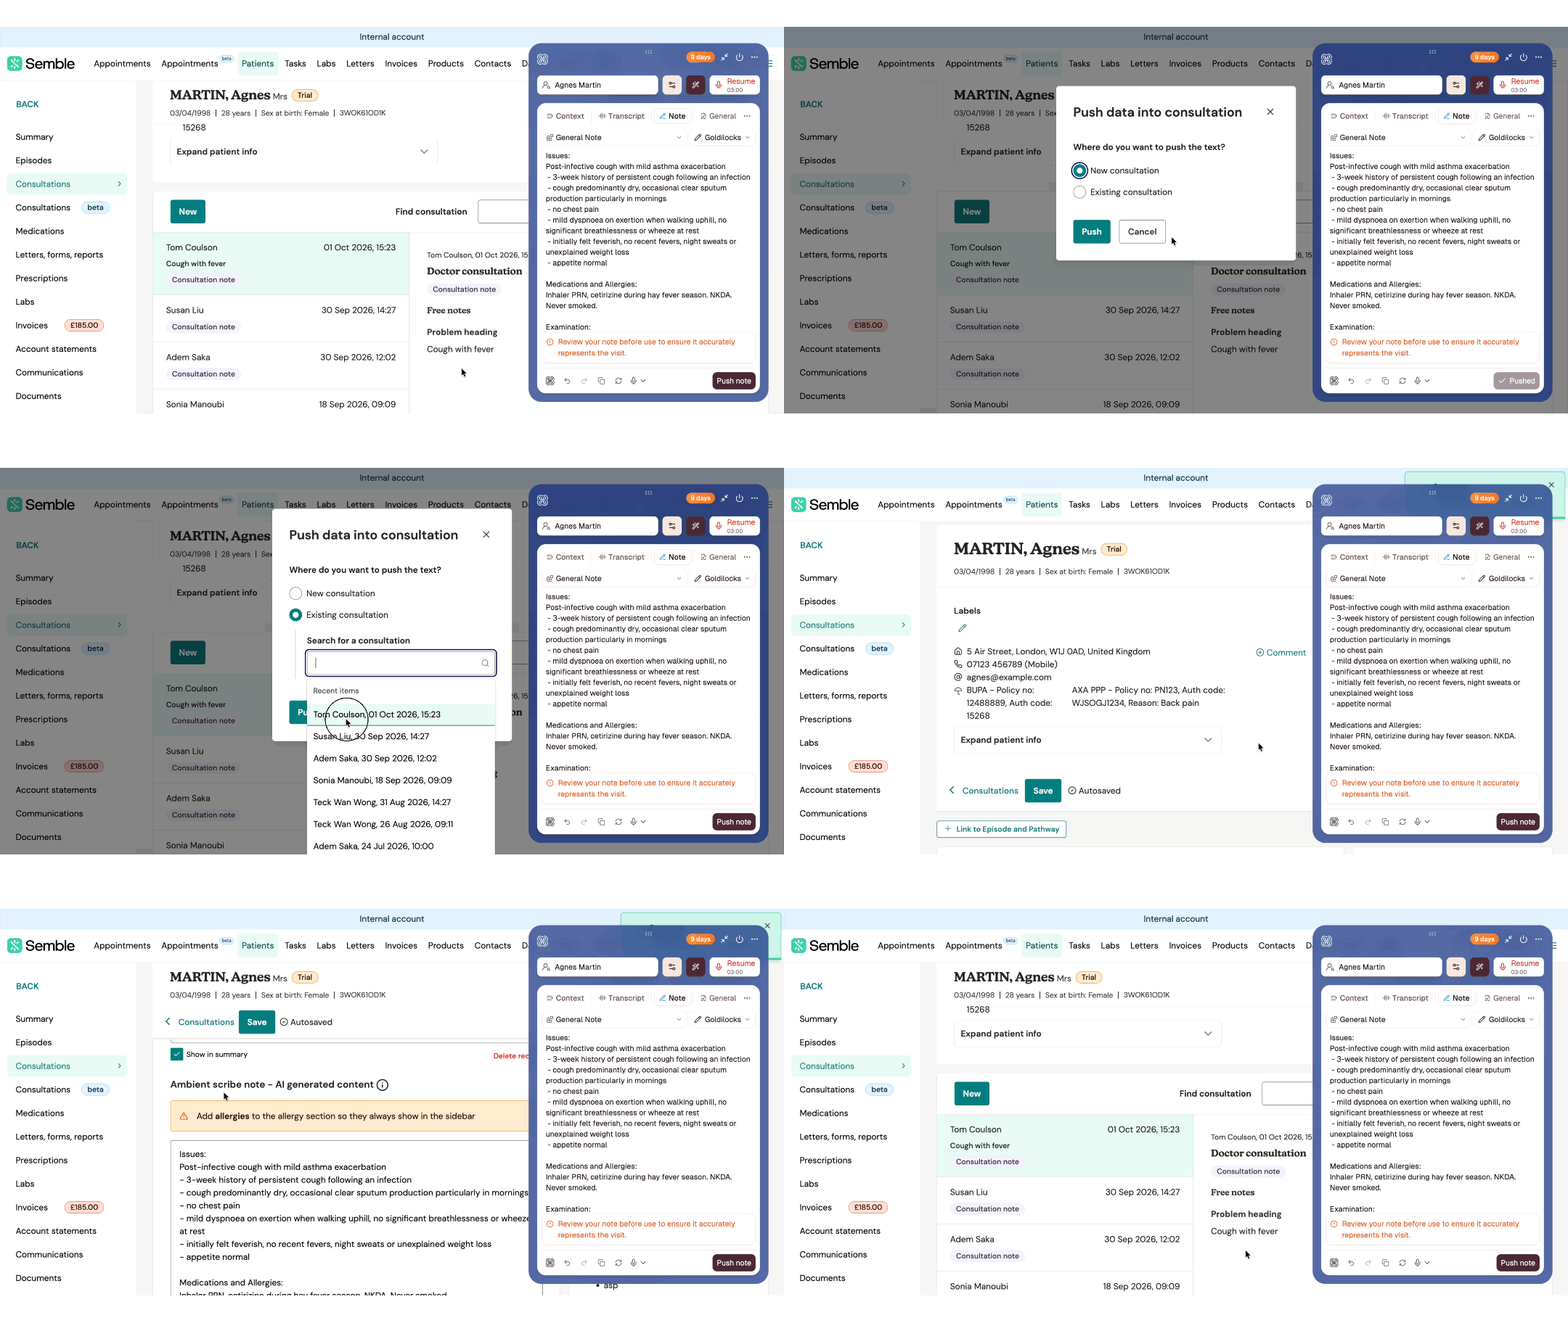
5. Make any edits necessary, record any allergies, or issue medications/products before finishing your note.
You must add allergies separately so they appear correctly in the sidebar, Snapshot and patient Summary, and are available in future consultations.
Please see more important information on recording allergies here: Recording allergies with Heidi
Add to your current consultation:
1. Click on Push note when inside the unfinished Semble consultation note.
2. A new Ambient scribe note section will be added as a new record at the bottom of the current note.
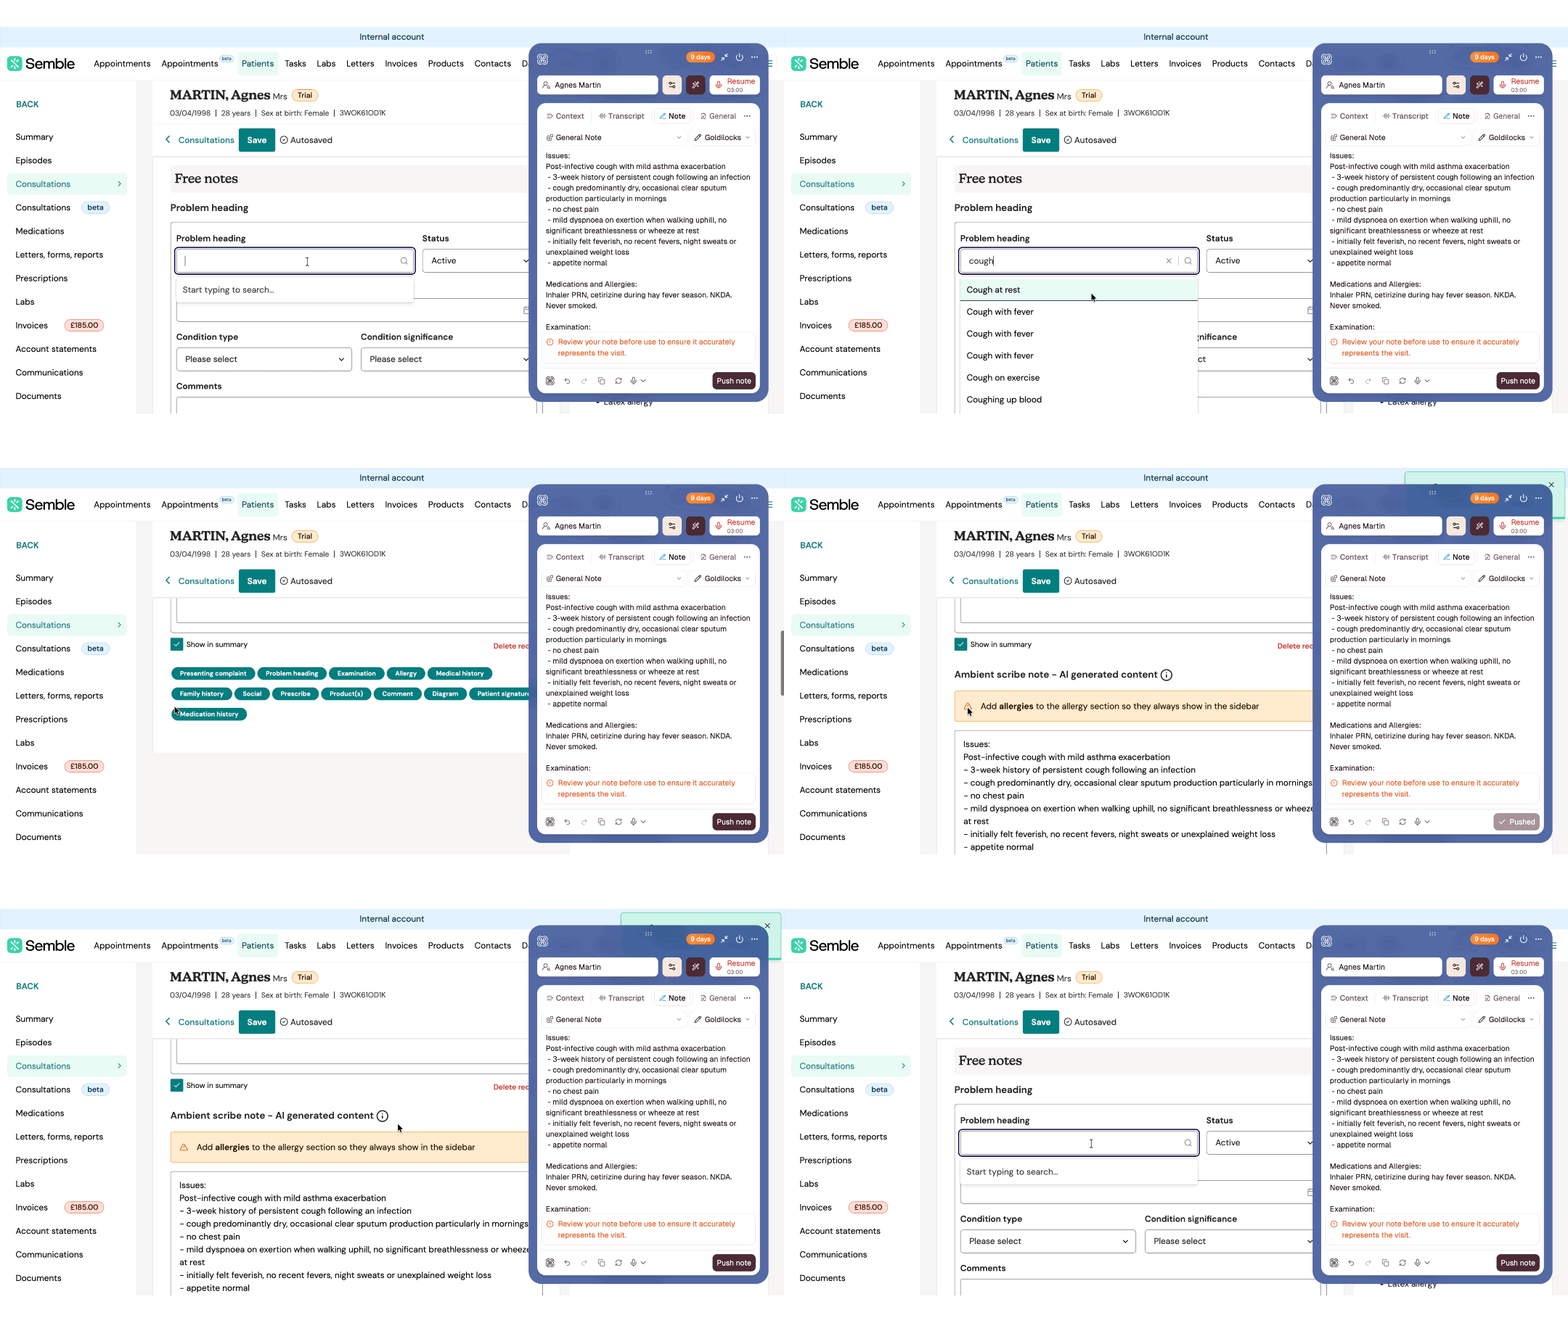
3. Make any edits necessary, record any allergies, or issue medications/products before finishing your note.
You must add allergies separately so they appear correctly in the sidebar, Snapshot and patient Summary, and are available in future consultations.
Please see more important information on recording allergies here: Recording allergies with Heidi
Recording allergies with Heidi
After pushing the note, add any allergies mentioned during the Heidi consultation to the dedicated Allergies section or Allergies box in the consultation.
You must add allergies separately if you want them to appear correctly in the sidebar and be visible in future consultations.
1. After adding your Heidi note, scroll to the bottom of the consultation.
2. Click on the Allergy record type to add a new allergy record.
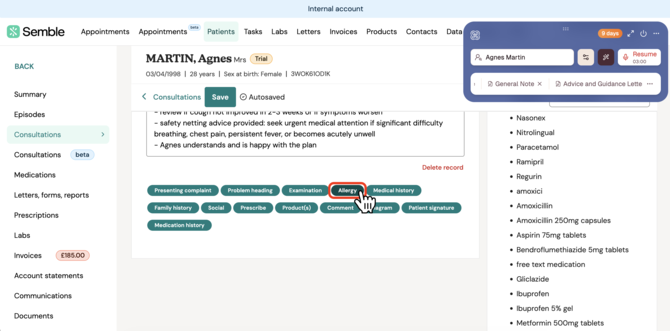
3. Select whether you're adding an Allergy or an Intolerance.
4. Add the allergy/intolerance in the top field, or record no known drug allergies.
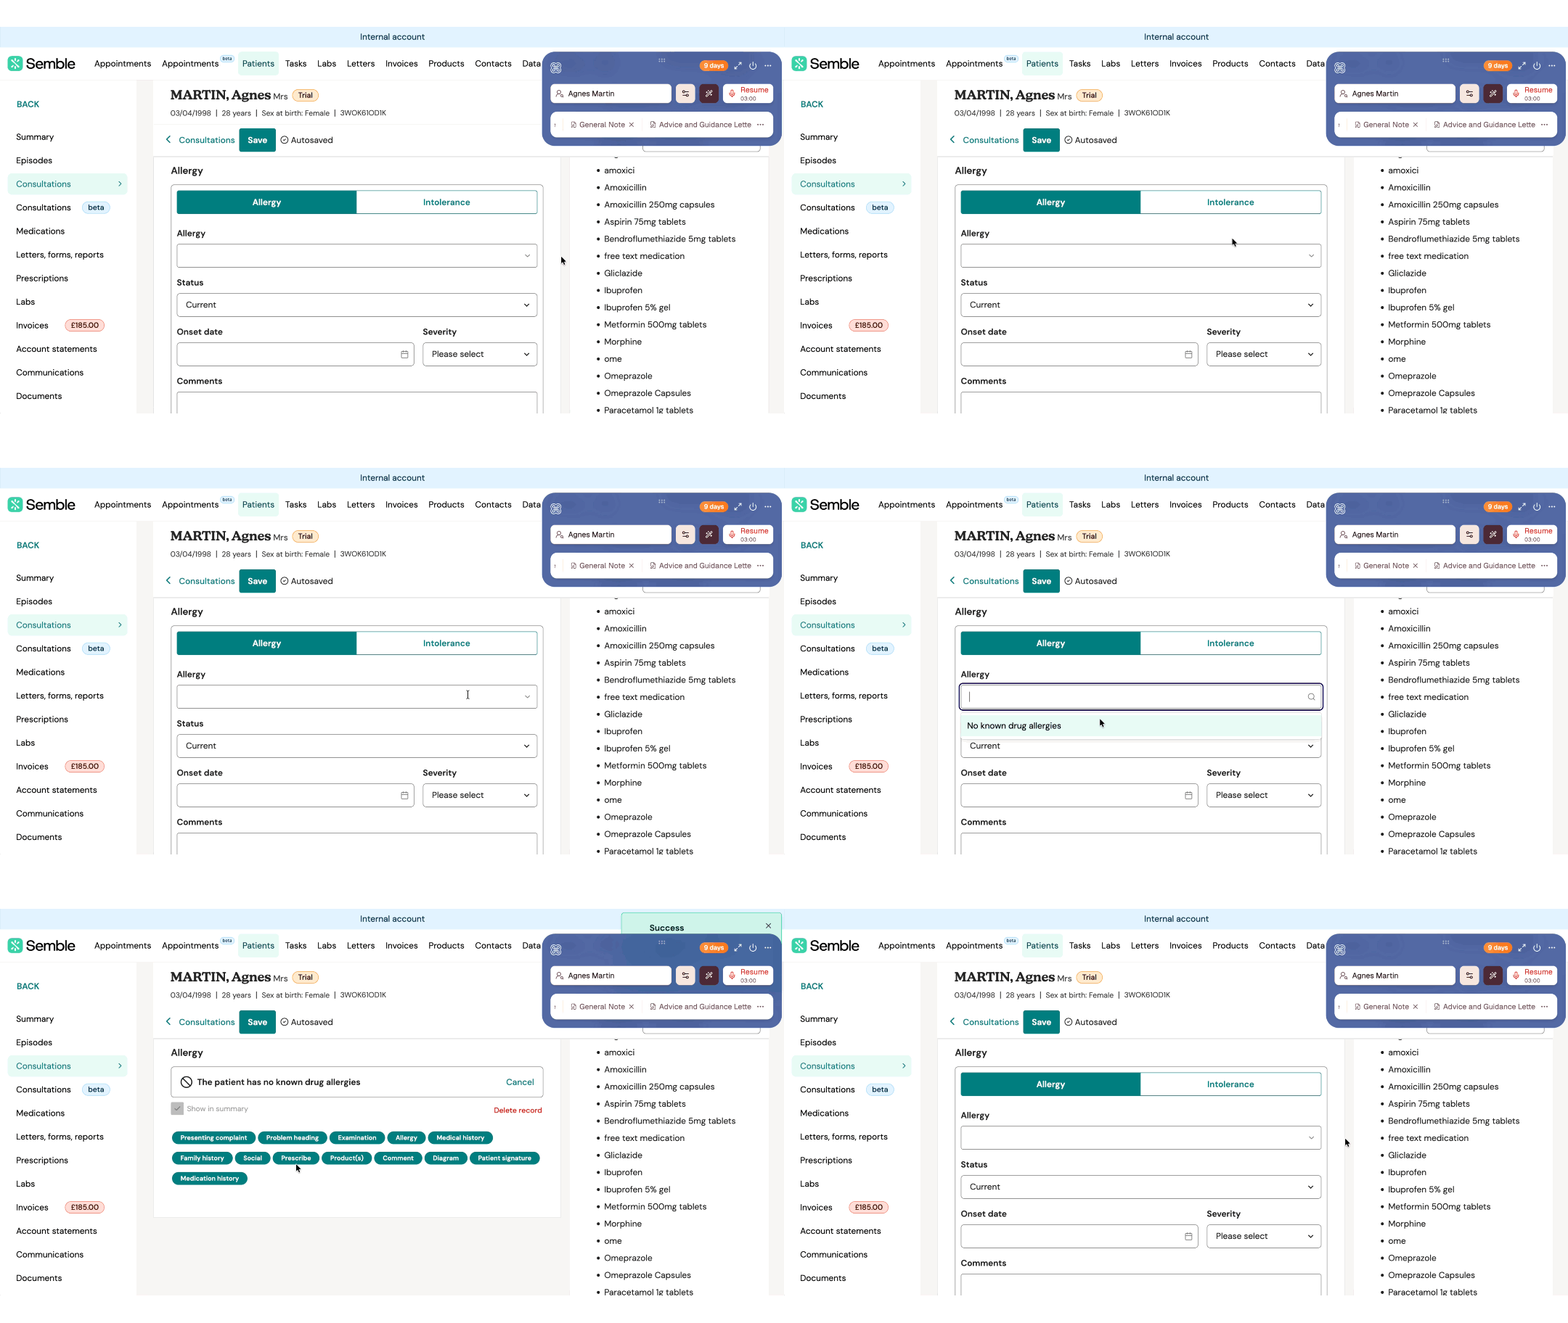
This field is included in the patient's Summary page by default. For more information, please see Managing Patients - Add Patient Allergies
Push Heidi note into a Semble letter
Heidi also allows you to seamlessly transfer your dictated notes into your letters. There are two ways to do this: if you are already editing a letter, or if you are not already editing a letter.
Note: If you have already generated a note template and need to change to a document template, see here: Switch between generating note and document templates
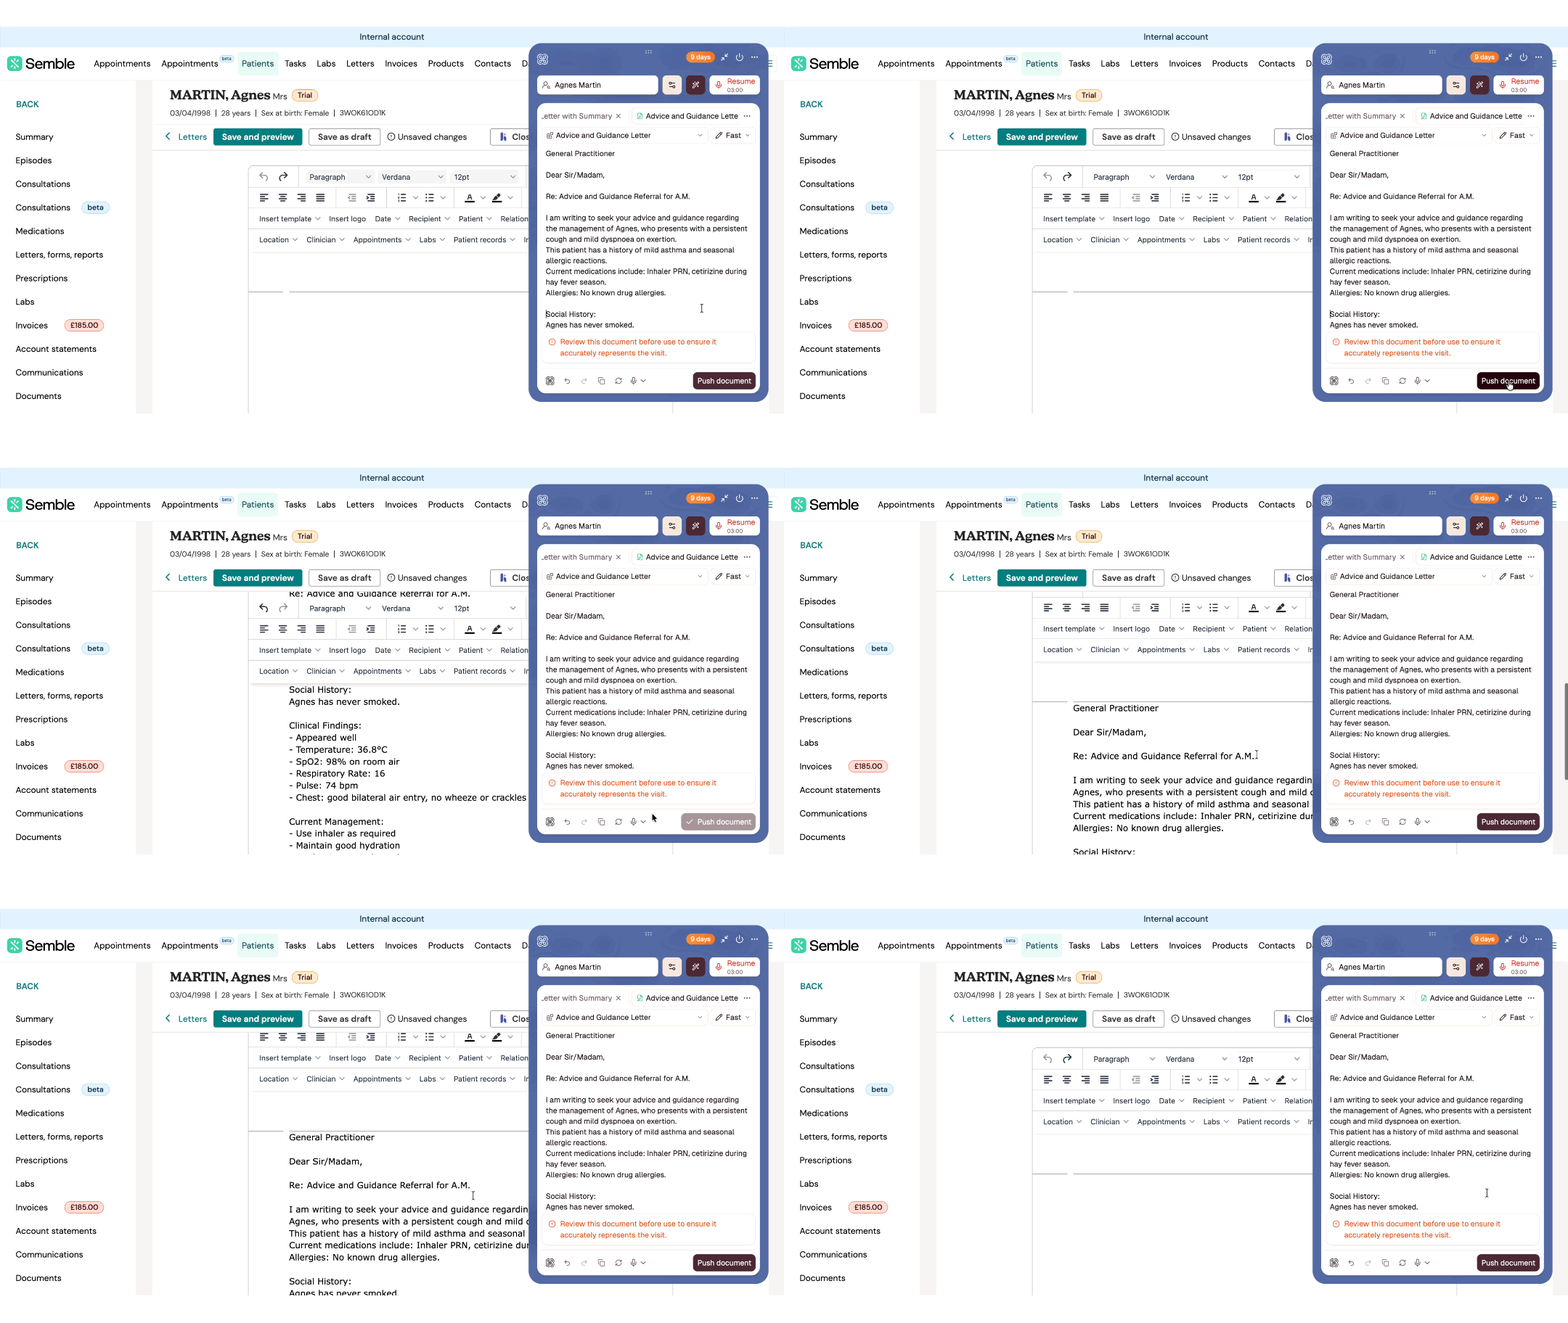
If you are already editing a letter:
1. Once your consultation is completed and you have selected your document template (see steps above), click on 'Push document'.
2. The document template will automatically be inserted into your letter.
3. Continue editing your letter as normal. For more information, please see Managing Letters.
If you are not already editing a letter:
1. Once your consultation is completed and you have selected your document template (see steps above), click on 'Push document'.
2. Select to push note either to a new letter, or an existing letter.
1. Click on Push.
2. The document template will be uploaded into a new letter draft.
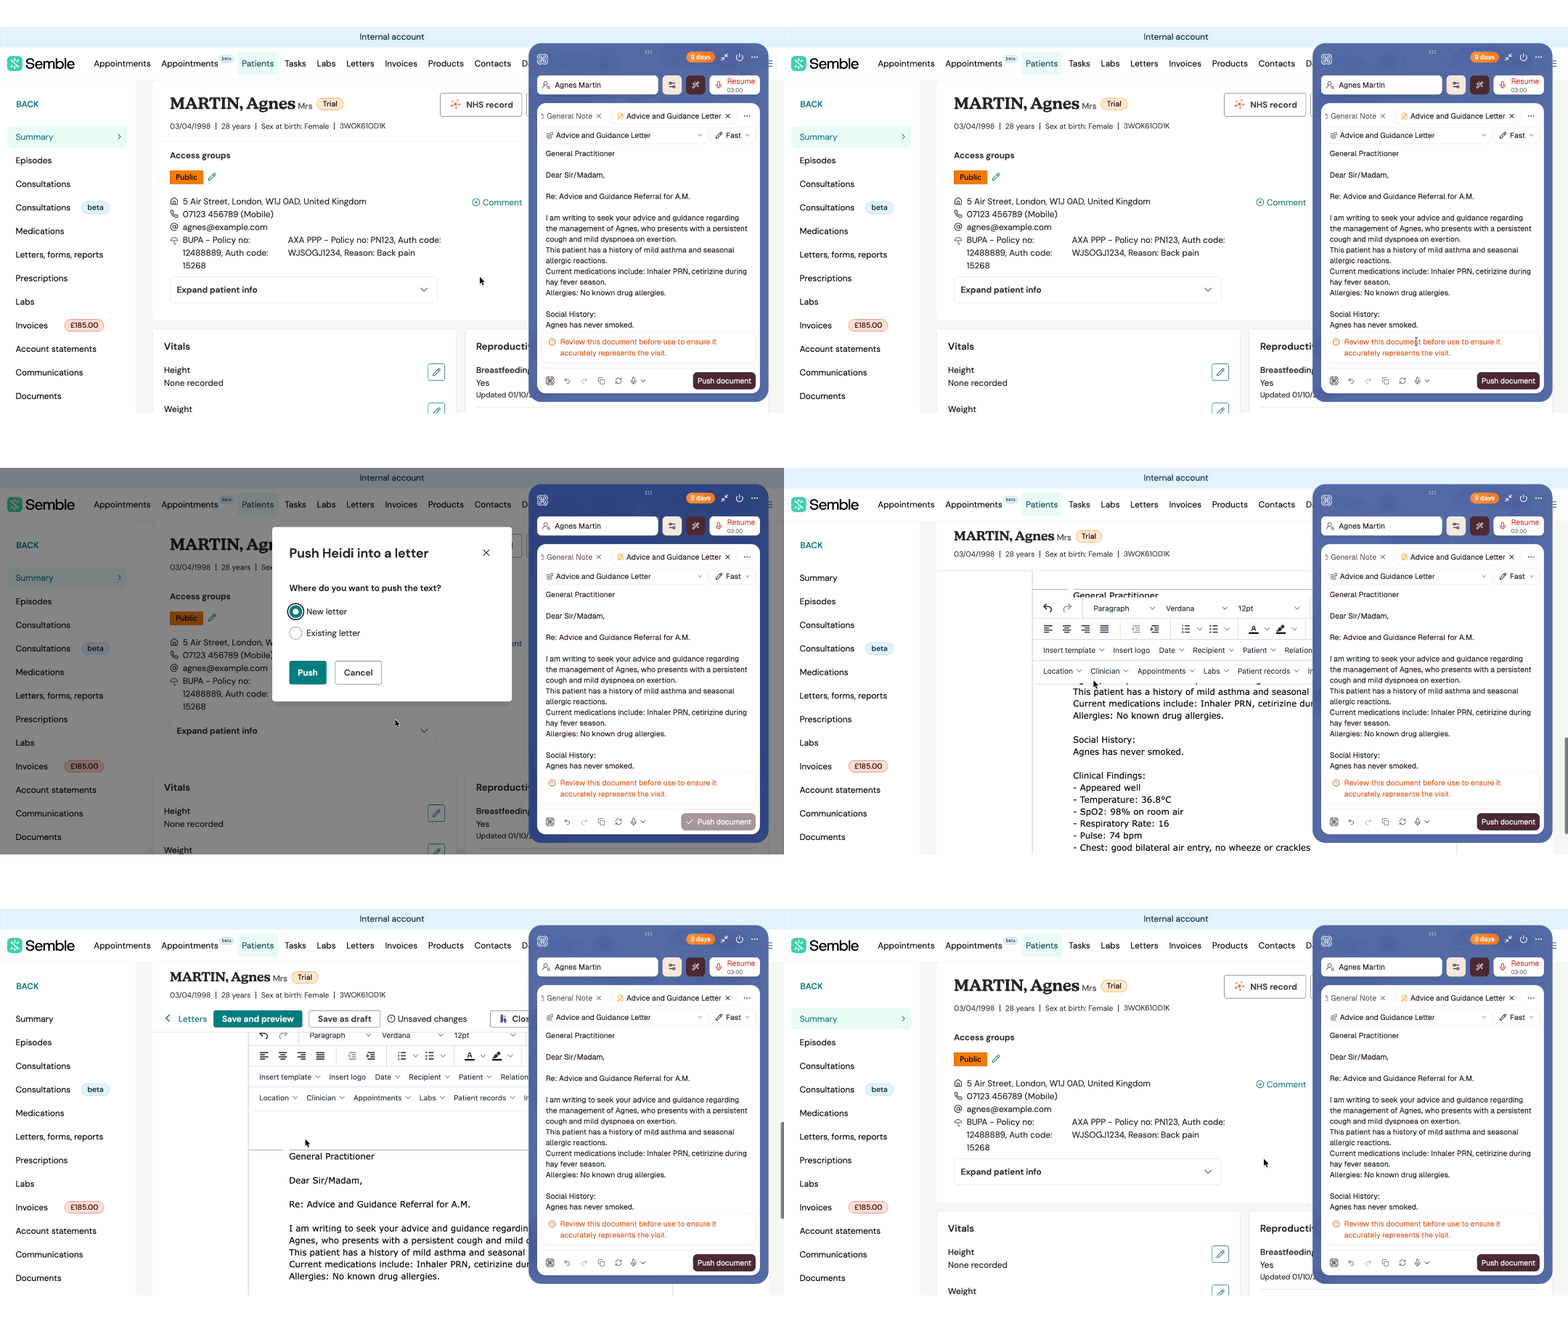
3. Continue editing your letter as normal. For more information, please see Managing Letters.
If you selected Existing letter:
1. Choose the letter to upload your template to from the dropdown options.
2. Click on Push.
3. The document template will be uploaded into the selected existing letter.
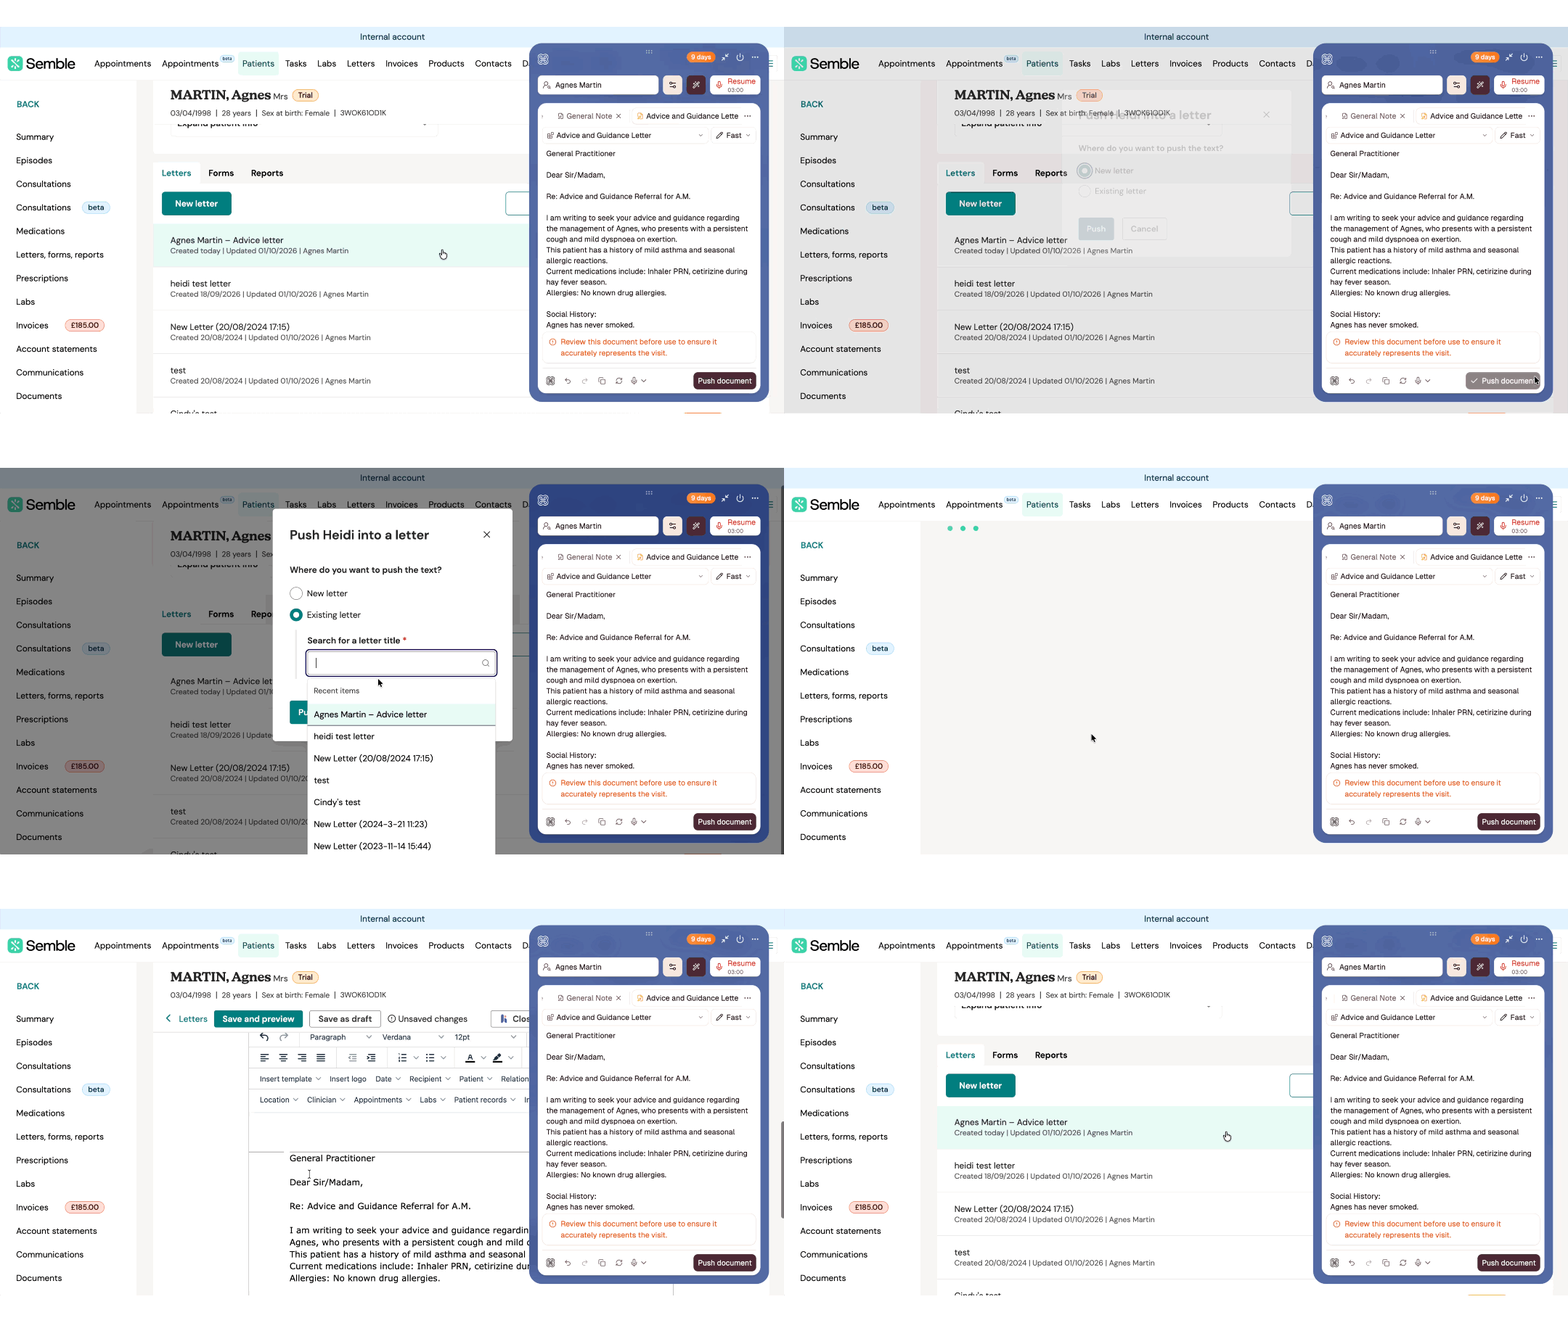
4. Continue editing your letter as normal. For more information, please see Managing Letters.
Switch between Note and Document templates
Use the Notes dropdown in the Heidi widget to change which Note template (for consultations) is being used. Each transcript can only generate one Note, but you can generate multiple documents.
Use the magic wand tool [  ] to create a new Document template.
Selecting a new type of note won't erase the existing note. You'll see a new tab added along the top of the widget to toggle between different notes you've created from one consultation.
See Heidi's Help Centre to learn more about the difference between a Note and a Document.
To generate a new note:
1. From your existing note, click on the notes dropdown to start selecting a new template.
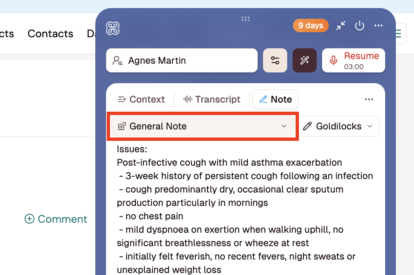
2. Find the new template you'd like to generate. Click on the template to begin re-generating a new note.
3. Heidi will begin working on generating the new content from the same transcript, but formatted for the new templates settings.
This will overwrite the previous note generated, and will not generate a new tab within the widget.
To generate a new document:
1. Click the magic wand tool next to the Resume/microphone button.
2. Choose the template you want to use. The magic wand shows document templates first, but you can also select a note template if preferred.
3. Heidi creates the output in a new tab with a document icon. Click on Push document to send the generated output into a Semble letter.
This will create a new tab to retain the original note to push to a consultation, but also lets you generate additional content to push into Letters.
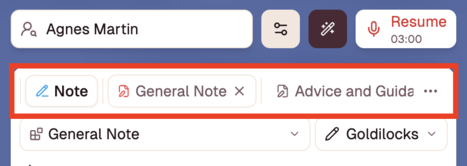
Note: Anything created using the magic wand is pushed into a letter, even if the selected Heidi template is categorised as a Note template.
Heidi Integration for Existing Subscribers
If you already have a Heidi subscription, your access to the integration will depend on your plan.
-
Practice Plan: If you are subscribed to the Practice Plan, you will be able to use the integration without any additional payment.
-
Other Plans: If you are on a plan below the Practice Plan, after your free trial you will need to upgrade in order to access the integration features.
Upgrade directly in your your Heidi account.
Alternatively, for plans with 1-50 users contact benwebber@heidihealth.com.
For plans with more than 50 users contact henry@heidihealth.com.
For more details, visit Heidi's pricing page.
For more details on Heidi's plans, you can refer to this guide.
Note: If you already have a Heidi account and want to integrate it with Semble, but the email address you use to login on Semble and the one you use to login on Heidi don’t match, please email support@heidihealth.com so they can help set it up for you before trying to log in.
Exploring Heidi's Features
Heidi offers a range of powerful tools to streamline your consultations and improve efficiency.
Here are some of the standout features you can access with the Heidi integration:
Multi-Lingual Translation
Heidi’s multi-lingual feature allows you to effortlessly translate consultations into another language, helping you communicate effectively with patients who speak different languages.
This feature breaks down language barriers in real time, ensuring smooth interactions during consultations.
Custom Templates
Automate your writing process with Heidi’s customisable templates. You can create templates tailored to different styles, such as:
Narrative
Patient-friendly
Clinical
As part of the Practice Plan, your dedicated Heidi customer success manager can assist with creating customised templates.
You can learn more about creating and managing these templates here:
Heidi Mobile App
Stay productive on the go with the Heidi mobile app. With it, you can:
Transcribe consultations in low or no Wi-Fi environments.
Seamlessly access your notes and templates from your mobile device, keeping everything you need at your fingertips.
For a deeper dive into how the app works and its features, check out:
Link: Heidi Mobile App Features
FAQ: Semble & Heidi integration – data sharing, responsibilities, and compliance
-
Does Heidi provide professional medical or healthcare advice?
-
What data is shared between Semble and Heidi, for what purpose, and when?
Do Semble and Heidi operate as the same provider?
No. Semble and Heidi remain independent providers, each responsible for their own services. That’s why to use Heidi services, users must enter into a separate contractual relationship directly with Heidi.
Your personal data used to provide Heidi’s services is managed by Heidi directly. Semble does not instruct Heidi on how to process that data. That’s why to use Heidi services, users must sign a Data Protection Agreement directly with Heidi acting as a data processor.
Semble and Heidi collaborate to deliver the integrated features offered through the Heidi integration within Semble’s product. This collaboration does not create a joint controller or sub-processor relationship.
Semble’s role is limited to the technical enablement of the data transfer to Heidi, exclusively for the purpose of delivering the services defined in the contract between the user and Heidi.
Does Heidi provide professional medical or healthcare advice?
No. Heidi does not provide medical or healthcare advice.
Its services are designed solely to support your administrative processes. You remain fully responsible for all professional decisions related to diagnosis, medical advice, or treatment.
Heidi is a generative AI tool in the health sector, but it must never be relied upon as professional medical device.
In the context of using AI-generated tools in the healthcare sector, healthcare authorities recommend that practitioners:
- Systematically review any generated content before using it, with particular attention to wording, sound-alike terms, or potential inaccuracies.
- Reformulate the generated text whenever necessary.
- Maintain full professional independence and expertise, using AI only as a support tool and never as a substitute for clinical judgment.
What data is shared between Semble and Heidi, for what purpose, and when?
The integration necessitates the following data sharing:
|
Phase |
Purpose |
Data |
|
Redirection phase |
To allow users to sign-up for Heidi’s services |
User identity :
No patient data is sent at this stage.
|
|
Use of Heidi services by users |
To allow users to use the Heidi services to which they have subscribed |
When the user opens Heidi for a specific patient, following data is automatically passed to Heidi:
When the user pushes a note from Heidi back to Semble, Heidi returns:
|
Is any data shared before I subscribe to Heidi?
- Practitioner data: may be shared when you choose to open the Heidi interface (to enable the redirection and setup). This relies on the precontractual legal basis.
- Patient data: no. Patient data is not shared until after you have subscribed to Heidi and you actively open Heidi for a specific patient.
What happens when I open Heidi for a patient?
- You launch Heidi from the patient’s record in Semble.
- Semble sends the patient’s name and patient ID to Heidi to set the session context.
- If you switch to another patient while Heidi is open, the widget closes to prevent accidental sharing.
What data can come back from Heidi to Semble?
When you push a note from Heidi, Heidi returns the note content (text and/or structured data) together with the associated patient reference so the note is attached to the right record in Semble.
Can I control which patient’s data is shared?
Yes. You initiate Heidi from a specific patient’s context; only that patient’s name and ID are shared. If you don’t open Heidi for a patient, no patient data for that patient is shared.
If I stop using Heidi, does sharing continue?
No. Sharing occurs only when you open Heidi and, for patients, only when you open Heidi for that patient. Your data held within Heidi is governed by your agreement with Heidi (retention, deletion, export).
Are consultation audios retained or stored?
No. Heidi does not store audio recordings of patient consultations. It uses ambient listening to transcribe in real time, and the audio itself is not retained.
What are my obligations towards patients?
You do not need to obtain your patient’s consent to use Heidi, as the processing is carried out for the purpose of providing health or social care or treatment.
However, you must comply with GDPR transparency requirements and inform your patients about how their data is used, including the recipients of their personal data.
How can I exercise my data rights (access, deletion, etc.) regarding the data used for Heidi’s services?
For the data processed directly by Heidi in its role as your data processor, you must contact Heidi to exercise your data rights.
Semble does not have access to, or control over, the data processed by Heidi for the purpose of providing its services.
For the notes generated by Heidi and sent to Semble for inclusion in the patient record, you can exercise your rights by contacting Semble’s support team.
Troubleshooting
If you encounter any issues while using Heidi with Semble, this guide provides steps to troubleshoot common problems and optimise your experience.
Changes in Settings Not Reflecting
After making changes to your settings in Heidi, ensure you refresh Semble for the updates to appear. Without refreshing, the changes may not be applied to your Semble integration.
Issues with Live Transcription and Saving
Heidi performs live transcription, but it does not keep an audio recording. This means:
If your internet connection is interrupted or your device powers off, unsaved transcriptions will be lost.
To prevent losing progress, make sure to save your work frequently during use.
Microphone Not Working
You can check the status of your microphone directly in the Heidi widget:
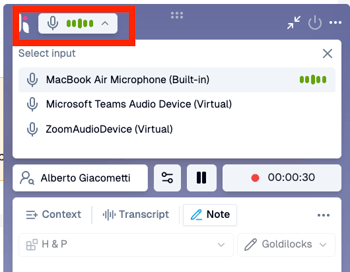
Top-left corner of the widget: A green icon means the microphone is active, while a red icon indicates it is not.
If your notes aren't generating it could be that you haven't enabled microphone access. For further assistance with microphone setup, visit Heidi’s Support Article on Microphone Troubleshooting.
Access to Templates
Heidi provides access to free templates, which vary depending on your chosen plan:
All users receive a selection of free templates.
All templates need to be managed within your Heidi account. Click here for more information on how to manage your templates.
Additional templates may be included in specific plans. For more information, check out the plan details.
If you encounter any further issues or have questions:
Email: Contact Heidi Health at support@heidihealth.com.
Chat: Use the messaging feature directly from your Heidi account.
Help centre and Troubleshooting: Take a look at Heidi's help centre to find the answers to the most frequently asked questions and troubleshooting guide.