
Automated email templates in Semble support HTML, which allows you to format text to make your automated emails clearer and more structured.
This article explains what HTML is and how to use basic HTML tags to format text—even if you have no technical or coding experience.
In this article:
How to add HTML to email templates
Linked articles:
Overview of SMS & email templates
The basics: What is HTML?
<b>Your content goes here.</b>
The above tag and text is called an element. An element is everything from the opening tag ( <b> ) to the closing tag ( </b> ). The text between the opening and closing tags will be styled according to the element you're using.
Note: Always make sure you use both opening and closing tag, or the formatting will not work correctly.
You can combine tags to apply multiple formatting options at once. Just make sure the tags are properly nested (closed in the reverse order they were opened). You do not need to add spaces in between tags.
e.g.
<b><u>This text is bold and underlined.</u></b> ✅
<b><u>This text is bold and underlined.</b></u> ❌
HTML tags you can use
Not all HTML tags can be used in Semble’s automated email templates, but you can use a range of basic tags to make text stand out, structure your email body into headers, or add numbered/bullet point lists.
Simple text formatting
Bold - <b> </b>
Italics - <i> </i>
Underlined - <u> </u>
Small text - <small> </small>
Headers
Headers help organise your content into clear sections. There are six levels of headers in HTML, from largest (<h1>) to smallest (<h6>).
For email templates, we recommend using <h2> or <h3> to keep formatting subtle and professional. This is because <h1> tends to be very large and is typically used for page titles, so for email content a smaller header usually looks more appropriate and professional.
<h1> Large header </h1>
<h2> Medium header </h2>
<h3> Small header </h3>
Lists
Lists can make information easier to read. You can create numbered lists (also called ordered lists) or bulleted lists (also call unordered lists).
Ordered/numbered lists:
You begin the element with the ordered list tag <ol>. Then, for each item, you add the opening list item tag <li>.
You can also add a closing </li> tag, but this is optional. The closing tag will add a little extra spacing between each item.
If you prefer a tighter list, you can leave the closing tag out. This is the only element that does not require both opening and closing tags.
You must complete your ordered list element with the closing tag </ol>.
Example:
Spaced list:<ol><li>Bread</li><li>Butter</li><li>Milk</li></ol> |
1. Bread 2. Butter 3. Milk |
|
Tight list:
|
1. Bread |
Unordered/bulleted lists:
This works similarly to ordered lists, but you need to change the opening and closing tags for the type of element being used. For bulleted lists, you use <ul> and </ul>.
You still use the list item tags <li> and </li> as before. Again, the closing tag is optional which will allow you to control how much space is between each list item.
Example:
|
Spaced list:
|
|
|
Tight list:
|
|
How to add HTML to email templates
Most of your automated email templates are already being formatted with HTML behind the scenes, so you won’t need to use any elements for paragraphs, fonts or line breaks.
You only need to add elements for the parts of your email that you want to be formatted differently to the default formatting. Simply start adding your elements as you need.
Tip: You can also add HTML tags alongside placeholder tags, but watch out for how you're nesting them.
e.g. <b>[[booking.start.time]]</b>
To learn more about how to create an automated email template first, please see our article here: Overview of SMS & email templates
It's usually easier to write the main body of your email first and then go back over it, adding your HTML tags and elements later.
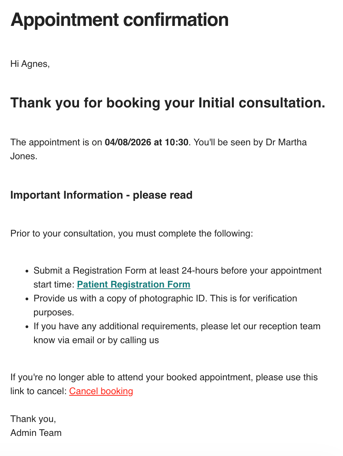
Here’s an example of some HTML formatting, and how it appears in the automated email being sent to your patients. Some of these elements are using the placeholders already available in Semble (beginning and ending with square brackets).
|
|
|
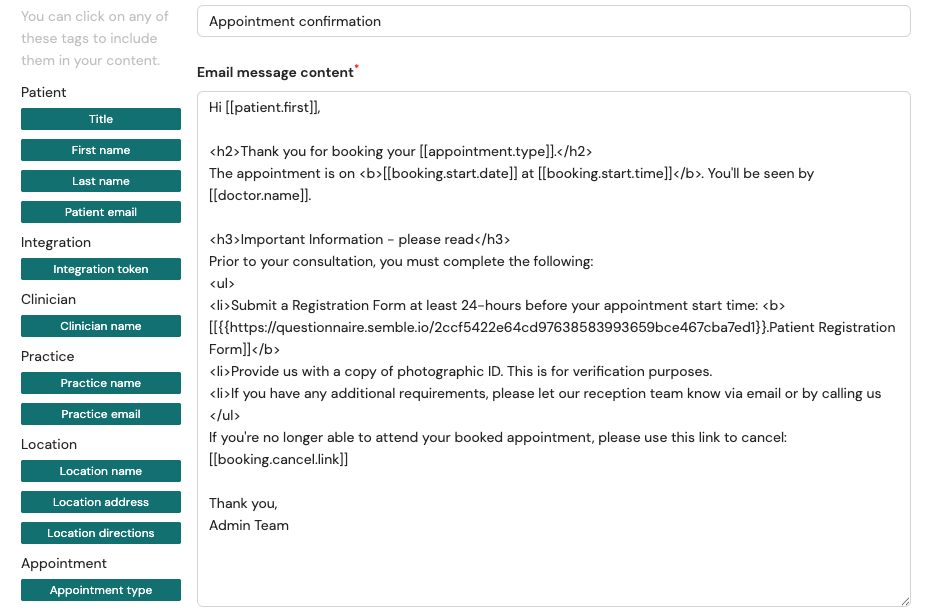
Note: Some elements, such as headers, will automatically add extra space under it to help formatting, so you may want to use only a single line underneath the header to help keep your template formatted as best as possible.
Troubleshooting
After formatting your templates with HTML elements, it's a good idea to book an appointment with a test or dummy patient so that you can review the layout before sending it to your patients.
If something doesn't look right in the email, you can find some troubleshooting tips for common issues below:
My formatting isn't showing — the tags are appearing as plain text
If you can see the HTML tags in your email rather than the formatted text, the tags may not have been entered correctly.
-
Check that you have used the correct angle brackets —
<and>— around your tag name. Curved brackets( )or square brackets[ ]will not work. Square brackets must only be used for the placeholders we provide for you e.g.[[patient.first]] -
Make sure there are no spaces between the angle bracket and the tag name. For example,
< b >will not work — it should be<b>. -
If you are using nested tags, ensure they are closed in the reverse order they were opened. See The basics: What is HTML? for an example.
My formatting is being applied to the entire email, not just the section I intended
This is usually caused by a missing closing tag. Without a closing tag, the formatting will continue to apply to all the text that follows.
-
Check that every opening tag has a matching closing tag — for example,
<b>must be closed with</b>. -
Make sure the closing tag includes a forward slash, and no other characters are inside the brackerts —
</b>not<b>. -
If you are using nested tags, ensure they are closed in the reverse order they were opened. See The basics: What is HTML? for an example.
My list isn't displaying correctly
If your list items are not appearing in the correct order, or the list is not rendering as expected, check the following:
-
Make sure the list is wrapped in either
<ol></ol>(for numbered lists) or<ul></ul>(for bulleted lists). -
Each list item should begin with
<li>. Forgetting this tag will cause items to run together rather than appear on separate lines. -
Ensure the closing
</ol>or</ul>tag is present at the end of the list. It must also match the opening tag – you shouldn't open with the tag for ordered lists, but close with the tag for unordered lists.
My placeholder tags are not working after I added HTML formatting
HTML tags and Semble placeholder tags (e.g. [[patient.first.name]]) can be used together, but they must not overlap or interrupt one another.
-
Make sure the HTML tag wraps the entire placeholder — for example:
<b>[[patient.first.name]]</b>. -
Do not split a placeholder tag across an HTML tag — for example:
<b>[[patient.first.</b>name]]will break the placeholder.
Note: It is very important not to remove any of the brackets or other characters used in placeholder tags and only replace exactly as specified.
There is too much space between my header and the content below it
Header elements such as <h1>, <h2>, and <h3> automatically add extra spacing beneath them. To reduce the visual gap:
-
Avoid adding a blank line between the closing header tag and the content below it.
-
Consider using a smaller header level — for example, switch from
<h2>to<h3>or<h4>. That should reduce the default size and spacing.